Netgear RN528X Software Manual - Page 207
Downloading Logs, To download logs, System Monitoring, ReadyNAS OS 6.7
 |
View all Netgear RN528X manuals
Add to My Manuals
Save this manual to your list of manuals |
Page 207 highlights
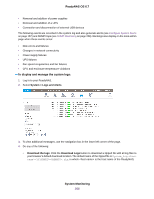
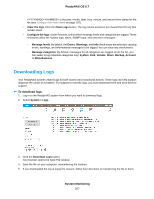
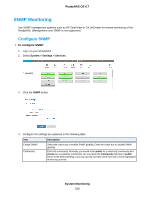
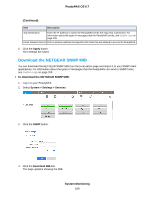
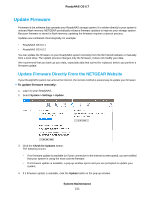
ReadyNAS OS 6.7 is the year, month, date, hour, minute, and second time stamp for the file (see Configure the Host Name on page 157). • Clear the logs. Click the Clear Logs button. The log entries onscreen are cleared but the log files remain intact. • Configure the logs. Under Records, select which message levels and categories are logged. These selections affect the system logs, alerts, SNMP traps, and onscreen messages: - Message levels. By default, the Errors, Warnings, and Info check boxes are selected, causing errors, warnings, and informational messages to be logged. You can clear any check boxes. - Message categories. By default, messages for all categories are logged. From the list, you can select to log individual categories only: System, Disk, Volume, Share, Backup, Account, or Miscellaneous. Downloading Logs Your ReadyNAS system creates logs for both routine and exceptional actions. These logs can help support diagnose the cause of a problem. For support to read the logs, you must download them and send them to support. To download logs: 1. Log in to the ReadyNAS system from which you want to download logs. 2. Select System > Logs. 3. Click the Download Logs button. Your browser opens the Save File window. 4. Save the file on your computer, remembering the location. 5. If you downloaded the log at support's request, follow their directions on transferring the file to them. System Monitoring 207
-
 1
1 -
2
-
3
-
4
-
5
-
6
-
7
-
8
-
9
-
10
-
11
-
12
-
13
-
14
-
15
-
16
-
17
-
18
-
19
-
20
-
21
-
22
-
23
-
24
-
25
-
26
-
27
-
28
-
29
-
30
-
31
-
32
-
33
-
34
-
35
-
36
-
37
-
38
-
39
-
40
-
41
-
42
-
43
-
44
-
45
-
46
-
47
-
48
-
49
-
50
-
51
-
52
-
53
-
54
-
55
-
56
-
57
-
58
-
59
-
60
-
61
-
62
-
63
-
64
-
65
-
66
-
67
-
68
-
69
-
70
-
71
-
72
-
73
-
74
-
75
-
76
-
77
-
78
-
79
-
80
-
81
-
82
-
83
-
84
-
85
-
86
-
87
-
88
-
89
-
90
-
91
-
92
-
93
-
94
-
95
-
96
-
97
-
98
-
99
-
100
-
101
-
102
-
103
-
104
-
105
-
106
-
107
-
108
-
109
-
110
-
111
-
112
-
113
-
114
-
115
-
116
-
117
-
118
-
119
-
120
-
121
-
122
-
123
-
124
-
125
-
126
-
127
-
128
-
129
-
130
-
131
-
132
-
133
-
134
-
135
-
136
-
137
-
138
-
139
-
140
-
141
-
142
-
143
-
144
-
145
-
146
-
147
-
148
-
149
-
150
-
151
-
152
-
153
-
154
-
155
-
156
-
157
-
158
-
159
-
160
-
161
-
162
-
163
-
164
-
165
-
166
-
167
-
168
-
169
-
170
-
171
-
172
-
173
-
174
-
175
-
176
-
177
-
178
-
179
-
180
-
181
-
182
-
183
-
184
-
185
-
186
-
187
-
188
-
189
-
190
-
191
-
192
-
193
-
194
-
195
-
196
-
197
-
198
-
199
-
200
-
201
-
 202
202 -
 203
203 -
 204
204 -
 205
205 -
 206
206 -
 207
207 -
 208
208 -
 209
209 -
 210
210 -
 211
211 -
 212
212 -
213
-
214
-
215
-
216
-
217
-
218
-
219
-
220
-
221
-
222
-
223
-
224
-
225
-
226
-
227
-
228
-
229
-
230
-
231
-
232
-
233
-
234
-
235
-
236
-
237
-
238
-
239
-
240
-
241
-
242
-
243
-
244
-
245
-
246
-
247
-
248
-
249
-
250
-
251
-
252
-
253
-
254
-
255
 |
 |
