Panasonic CN-NVD905U Navigation Dvd Player - Page 22
Check mounting and wiring, Installation confrimation - gps antenna
 |
UPC - 037988757947
View all Panasonic CN-NVD905U manuals
Add to My Manuals
Save this manual to your list of manuals |
Page 22 highlights
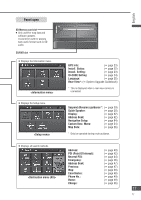
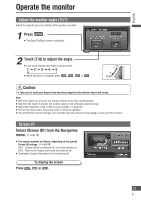
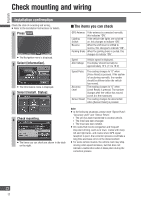
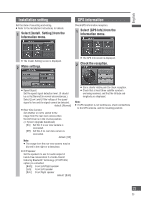
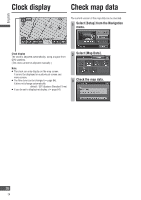
English Check mounting and wiring Installation confirmation Check the state of mounting and wiring. Refer to the Installation Instructions for details. 1 Press . The Navigation menu is displayed. 2 Select [Information]. The Information menu is displayed. 3 Select [Install. Status]. 4 Check mounting. The items you can check are shown in the table on the right. The items you can check GPS Antenna If the antenna is connected normally, this indicates "ON". Lighting If the vehicle side lights are switched Switch on, this changes to indicate "ON". Reverse When the shift lever is shifted to reverse, this changes to indicate "ON". Parking Brake When the parking brake is pulled, this changes to indicate "ON". Speed ACC Voltage Vehicle speed is displayed. The display should normally be approximately 12 V. (11 to 16 V) Speed Pulse Accuracy Level Sensor Reset The reading changes to "0" when [Pulse Reset] is pressed. If the system is functioning normally, the number should be different after the vehicle has moved. The reading changes to "0" when [Level Reset] is pressed. The number changes after the vehicle has moved. (Level 4 is the maximum) The reading changes to uncorrected when [Sensor Reset] is pressed. Note: In the following situations, please reset "Speed Pulse", "Accuracy Level" and "Sensor Reset". The unit has been transferred to another vehicle. The tires have been changed. The tires have been rotated. On routes that involve congestion and frequent stop-start driving, such as in town, routes with many left and right turns, and routes where GPS signal reception is poor, the correction process could take a long time and leave errors in the stored content. For some vehicle models, the vehicle mark may stop moving when speed increases, but that does not indicate a malfunction when it takes place during the correction process. 22 22
-
 1
1 -
2
-
3
-
4
-
5
-
6
-
7
-
8
-
9
-
10
-
11
-
12
-
13
-
14
-
15
-
16
-
 17
17 -
 18
18 -
 19
19 -
 20
20 -
 21
21 -
 22
22 -
 23
23 -
 24
24 -
 25
25 -
 26
26 -
 27
27 -
28
-
29
-
30
-
31
-
32
-
33
-
34
-
35
-
36
-
37
-
38
-
39
-
40
-
41
-
42
-
43
-
44
-
45
-
46
-
47
-
48
-
49
-
50
-
51
-
52
-
53
-
54
-
55
-
56
-
57
-
58
-
59
-
60
-
61
-
62
-
63
-
64
-
65
-
66
-
67
-
68
-
69
-
70
-
71
-
72
-
73
-
74
-
75
-
76
-
77
-
78
-
79
-
80
-
81
-
82
-
83
-
84
-
85
-
86
-
87
-
88
-
89
-
90
-
91
-
92
-
93
-
94
-
95
-
96
-
97
-
98
-
99
-
100
-
101
-
102
-
103
-
104
-
105
-
106
-
107
-
108
-
109
-
110
-
111
-
112
-
113
-
114
-
115
-
116
-
117
-
118
 |
 |
