Panasonic DMR-HW100EBK Operating Instructions - Page 48
Playing photos
 |
View all Panasonic DMR-HW100EBK manuals
Add to My Manuals
Save this manual to your list of manuals |
Page 48 highlights
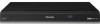
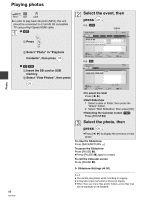
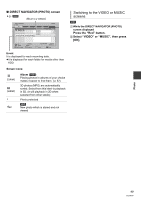
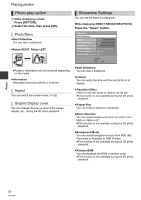
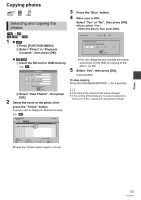
Photo Playing photos Photo ≥In order to play back 3D photo (MPO), this unit should be connected to a Full HD 3D compatible TV using a High Speed HDMI cable. ∫ [HDD] 1 Press . Select the event, then press OK . e.g., [HDD] Label DIRECT NAVIGATOR HDD All Album1 Album2 Album3 Album4 Date & Event Name 03/01/2010 05/01/2010 29/10/2010 25/02/2011 PHOTO 3D Photos 8 12 18 4 FUNCTION MENU 2 Select "Photo" in "Playback Contents", then press OK . ∫ [SD] [USB] 1 Insert the SD card or USB memory. 2 Select "View Photos", then press OK RETURN VIDEO / MUSIC Calendar OPTION Slideshow Page 0002/0002 Select Page Up CH Page Down Copy e.g., [SD] DIRECT NAVIGATOR SD card 2D 3D Folder Name 001_AAA PHOTO Photos 4 OK . OK RETURN OPTION Slideshow Page 0001/0001 Select Copy ≥To select the label Press [2, 1]. ≥Start Slideshow 1 Select a date or folder, then press the "Green" button. 2 Select "Start Slideshow" then press [OK]. ≥Switching the Calendar screen ([HDD]) Press [PAUSE ;]. Select the photo, then press OK . ≥Press [2, 1] to display the previous or next photo. To stop the Slideshow Press [BACK/RETURN ]. To pause the Slideshow Press [PAUSE ;]. ≥Press [PAUSE ;] again to restart. To exit the Calendar screen Press [PAUSE ;]. ¾ Slideshow Settings (> 50) 48 VQT3F57 ≥ You cannot play photos while recording or copying. ≥ It may take a few moments for photos to display. ≥ When there are many files and/or folders, some files may not be displayed or be playable.
-
 1
1 -
2
-
3
-
4
-
5
-
6
-
7
-
8
-
9
-
10
-
11
-
12
-
13
-
14
-
15
-
16
-
17
-
18
-
19
-
20
-
21
-
22
-
23
-
24
-
25
-
26
-
27
-
28
-
29
-
30
-
31
-
32
-
33
-
34
-
35
-
36
-
37
-
38
-
39
-
40
-
41
-
42
-
 43
43 -
 44
44 -
 45
45 -
 46
46 -
 47
47 -
 48
48 -
 49
49 -
 50
50 -
 51
51 -
 52
52 -
 53
53 -
54
-
55
-
56
-
57
-
58
-
59
-
60
-
61
-
62
-
63
-
64
-
65
-
66
-
67
-
68
-
69
-
70
-
71
-
72
-
73
-
74
-
75
-
76
-
77
-
78
-
79
-
80
-
81
-
82
-
83
-
84
-
85
-
86
-
87
-
88
-
89
-
90
-
91
-
92
-
93
-
94
-
95
-
96
-
97
-
98
-
99
-
100
-
101
-
102
-
103
-
104
 |
 |