Panasonic DMR-HW100EBK Operating Instructions - Page 53
Copying photos
 |
View all Panasonic DMR-HW100EBK manuals
Add to My Manuals
Save this manual to your list of manuals |
Page 53 highlights
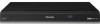
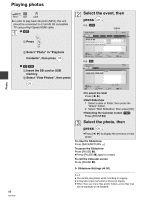
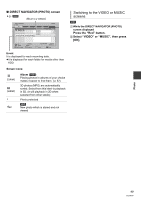
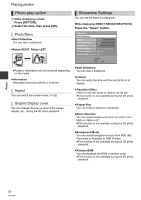
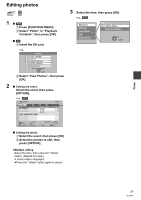
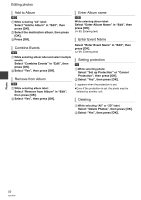
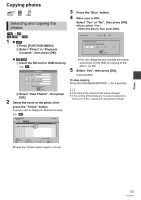
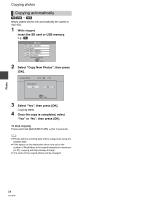
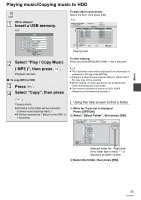
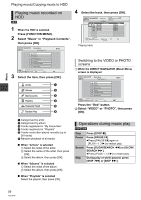
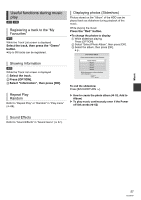
Copying photos Selecting and copying the photos [HDD] > [SD] [SD] [USB] > [HDD] 1 ∫ [HDD] 1 Press [FUNCTION MENU]. 2 Select "Photo" in "Playback Contents", then press [OK]. 3 Press the "Blue" button. 4 When copy to HDD: Select "Yes" or "No", then press [OK]. ≥If you select "Yes": Select the album, then press [OK]. Copy Photos SD card HDD HDD Album Selection Please select the destination album. Album1 Album2 Album3 OK RETURN Album4 ∫ [SD] [USB] ≥You can categorise and manage the events 1 Insert the SD card or USB memory. and photos on the HDD by copying to the e.g., [SD] album. (> 49) SD Card 5 Select "Yes", then press [OK]. Play Video ( AVCHD ) View Photos Copy Video ( AVCHD ) Copy Video ( MPEG2 ) Copy New Photos SD card is inserted. OK RETURN 2 Select "View Photos", then press [OK]. 2 Select the event or the photo, then Copying starts. To stop copying Press and hold [BACK/RETURN ] for 3 seconds. ≥ The name of the copied photos will be changed. ≥ If the number of files/folders to be copied exceeds the maximum (> 97), copying will stop partway through. press the "Yellow" button. A check mark is displayed. Repeat this step. e.g., [SD] DIRECT NAVIGATOR SD card 2D 3D Folder Name 001_AAA PHOTO Photos 4 OK RETURN OPTION Slideshow Page 0001/0001 Select Copy ≥Press the "Yellow" button again to cancel. Photo 53 VQT3F57
-
 1
1 -
2
-
3
-
4
-
5
-
6
-
7
-
8
-
9
-
10
-
11
-
12
-
13
-
14
-
15
-
16
-
17
-
18
-
19
-
20
-
21
-
22
-
23
-
24
-
25
-
26
-
27
-
28
-
29
-
30
-
31
-
32
-
33
-
34
-
35
-
36
-
37
-
38
-
39
-
40
-
41
-
42
-
43
-
44
-
45
-
46
-
47
-
 48
48 -
 49
49 -
 50
50 -
 51
51 -
 52
52 -
 53
53 -
 54
54 -
 55
55 -
 56
56 -
 57
57 -
 58
58 -
59
-
60
-
61
-
62
-
63
-
64
-
65
-
66
-
67
-
68
-
69
-
70
-
71
-
72
-
73
-
74
-
75
-
76
-
77
-
78
-
79
-
80
-
81
-
82
-
83
-
84
-
85
-
86
-
87
-
88
-
89
-
90
-
91
-
92
-
93
-
94
-
95
-
96
-
97
-
98
-
99
-
100
-
101
-
102
-
103
-
104
 |
 |
