Panasonic HC-X1000 HC-X1000 Advanced Features Manuals (English) - Page 19
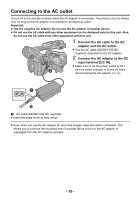
Connecting to the AC outlet, Connect the AC cable to the AC, adaptor and the AC outlet.
 |
View all Panasonic HC-X1000 manuals
Add to My Manuals
Save this manual to your list of manuals |
Page 19 highlights
Connecting to the AC outlet The unit is in the standby condition when the AC adaptor is connected. The primary circuit is always "live" as long as the AC adaptor is connected to an electrical outlet. Important: ≥ Use the supplied AC adaptor. Do not use the AC adaptor of another device. ≥ Do not use the AC cable with any other equipment as it is designed only for this unit. Also, do not use the AC cable from other equipment with this unit. 1 Connect the AC cable to the AC adaptor and the AC outlet. ≥ Use the AC cable (K2CB2YY00106; supplied) dedicated for the AC adaptor. 2 Connect the AC adaptor to the DC input terminal [DC IN]. ≥ Make sure to set the power switch to OFF and the status indicator is turned off when disconnecting the AC adaptor. (l 22) A AC cable (K2CB2YY00106; supplied) ≥ Insert the plugs as far as they will go. ≥ Even when you use the AC adaptor for recording images, keep the battery connected. This allows you to continue the recording even if a power failure occurs or the AC adaptor is unplugged from the AC outlet by accident. - 19 -
-
 1
1 -
2
-
3
-
4
-
5
-
6
-
7
-
8
-
9
-
10
-
11
-
12
-
13
-
 14
14 -
 15
15 -
 16
16 -
 17
17 -
 18
18 -
 19
19 -
 20
20 -
 21
21 -
 22
22 -
 23
23 -
 24
24 -
25
-
26
-
27
-
28
-
29
-
30
-
31
-
32
-
33
-
34
-
35
-
36
-
37
-
38
-
39
-
40
-
41
-
42
-
43
-
44
-
45
-
46
-
47
-
48
-
49
-
50
-
51
-
52
-
53
-
54
-
55
-
56
-
57
-
58
-
59
-
60
-
61
-
62
-
63
-
64
-
65
-
66
-
67
-
68
-
69
-
70
-
71
-
72
-
73
-
74
-
75
-
76
-
77
-
78
-
79
-
80
-
81
-
82
-
83
-
84
-
85
-
86
-
87
-
88
-
89
-
90
-
91
-
92
-
93
-
94
-
95
-
96
-
97
-
98
-
99
-
100
-
101
-
102
-
103
-
104
-
105
-
106
-
107
-
108
-
109
-
110
-
111
-
112
-
113
-
114
-
115
-
116
-
117
-
118
-
119
-
120
-
121
-
122
-
123
-
124
-
125
-
126
-
127
-
128
-
129
-
130
-
131
-
132
-
133
-
134
-
135
-
136
-
137
-
138
-
139
-
140
-
141
-
142
-
143
-
144
-
145
-
146
-
147
-
148
-
149
-
150
-
151
-
152
-
153
-
154
-
155
-
156
-
157
-
158
-
159
-
160
-
161
-
162
-
163
-
164
-
165
-
166
-
167
-
168
-
169
-
170
-
171
-
172
-
173
-
174
-
175
-
176
-
177
-
178
-
179
-
180
 |
 |
