Panasonic HC-X1000 HC-X1000 Advanced Features Manuals (English) - Page 62
Using the USER button, Switch display/not-display of the USER buttons
 |
View all Panasonic HC-X1000 manuals
Add to My Manuals
Save this manual to your list of manuals |
Page 62 highlights
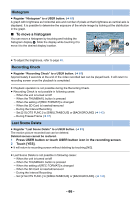
Using the USER button To use the set USER button, press USER1 to USER6 button or touch the USER7 to USER10 button icon displayed when you touch the LCD monitor. (When you use the USER1 to USER5 button) (When you use the USER6 button) FOCUS ASSIST 5 USER 1 2 3 4 6 REC CHECK (When you use the USER7 to USER10 button) USER7 USER8 USER9 USER10 ≥ To cancel, press the USER button or touch the USER button icon again. For canceling or using of the following functions for the USER buttons, refer to each page. j Black Fade (l 64) j White Fade (l 64) j Digital Zoom (l 65) j Recording Check (l 66) j Last Scene Delete (l 66) j Area Mode (l 68) j Focus Transition (l 43) j Background (l 71) ∫ Switch display/not-display of the USER buttons Display/not-display of the USER button icons in the LCD monitor can be switched. MENU : [DISP SETUP] # [USER BUTTON DISPLAY] # [ON] or [OFF] ∫ Check the setting of the USER buttons To check the settings of the USER buttons (USER1 to USER6) in the recording screen, press and hold on the DISP/MODE CHK button. DISP MODE CHK - 62 -
-
 1
1 -
2
-
3
-
4
-
5
-
6
-
7
-
8
-
9
-
10
-
11
-
12
-
13
-
14
-
15
-
16
-
17
-
18
-
19
-
20
-
21
-
22
-
23
-
24
-
25
-
26
-
27
-
28
-
29
-
30
-
31
-
32
-
33
-
34
-
35
-
36
-
37
-
38
-
39
-
40
-
41
-
42
-
43
-
44
-
45
-
46
-
47
-
48
-
49
-
50
-
51
-
52
-
53
-
54
-
55
-
56
-
 57
57 -
 58
58 -
 59
59 -
 60
60 -
 61
61 -
 62
62 -
 63
63 -
 64
64 -
 65
65 -
 66
66 -
 67
67 -
68
-
69
-
70
-
71
-
72
-
73
-
74
-
75
-
76
-
77
-
78
-
79
-
80
-
81
-
82
-
83
-
84
-
85
-
86
-
87
-
88
-
89
-
90
-
91
-
92
-
93
-
94
-
95
-
96
-
97
-
98
-
99
-
100
-
101
-
102
-
103
-
104
-
105
-
106
-
107
-
108
-
109
-
110
-
111
-
112
-
113
-
114
-
115
-
116
-
117
-
118
-
119
-
120
-
121
-
122
-
123
-
124
-
125
-
126
-
127
-
128
-
129
-
130
-
131
-
132
-
133
-
134
-
135
-
136
-
137
-
138
-
139
-
140
-
141
-
142
-
143
-
144
-
145
-
146
-
147
-
148
-
149
-
150
-
151
-
152
-
153
-
154
-
155
-
156
-
157
-
158
-
159
-
160
-
161
-
162
-
163
-
164
-
165
-
166
-
167
-
168
-
169
-
170
-
171
-
172
-
173
-
174
-
175
-
176
-
177
-
178
-
179
-
180
 |
 |
