Philips DVDR615 User manual - Page 52
Photo editing
 |
UPC - 037849945629
View all Philips DVDR615 manuals
Add to My Manuals
Save this manual to your list of manuals |
Page 52 highlights
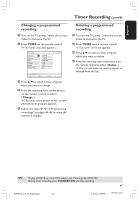
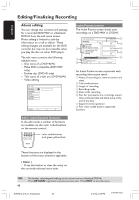
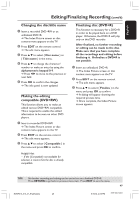
English Editing/Finalising Recording (cont'd) { Append } - for DVD+RW only - Select this to append record to the existing recording from the position of the playback. Continue steps 5~7. For append recording only: 5 Press 3 4 to select the input channel to append : { preset program number }, { EXT1 }, { EXT 2 } or { CAM1 .} 6 Press REC 0 to start append recording. Warning! Once the recording started, any prior recording from the point of the playback onwards will be overwritten. 7 To stop append recording, press STOP 9. Deleting chapter markers You can choose to delete all the chapter markers in the current recording. 1 Follow the steps 1~3 of "Video editing" on page 50. 2 Press the matching color coded button on the remote control to select { No Chapters .} Photo editing The Photo (JPEG picture) recordings on a DVD+R(W) are limited to edit the information. The editable information items are : - Title of the currently selected item - Album edit name - Photo edit date 1 Insert a recorded DVD+RW or an unfinalized DVD+R. 2 Use 1 2 3 4 to select an entry in the menu. 3 Press EDIT on the remote control. ➜ The relevant edit menu appears. 4 Press 3 4 to change the character/ number or make an entry by using the alphanumeric keypad 0-9. ➜ Press 1 2 to move to the previous or next entry field. 5 Press OK to confirm the changes. ➜ The info panel is now updated. During photo (JPEG picture) playback, you can modify the photo display. However, the changes cannot be stored in the disc. 1 During playback, press EDIT. 2 Press 2 to select { Photo options } on the screen, then press 4 to select { Filter } or { Color Adjust .} 3 Press 2 to access to the menu, then press 3 4 to select the available setting. Helpful Hint: - Editing of the audio content is not possible. For information on organizing the JPEG pictures, see pages 54~56 "Browsing the picture disc." TIPS: 52 No further recording and editing can be carried out on a finalized DVD+R. Press RETURN to go back to previous menu item. Press EDIT to exit the menu. DVDR610_615_37_Engfinal434 52 8/16/04, 4:09 PM 3139 246 14221
-
 1
1 -
2
-
3
-
4
-
5
-
6
-
7
-
8
-
9
-
10
-
11
-
12
-
13
-
14
-
15
-
16
-
17
-
18
-
19
-
20
-
21
-
22
-
23
-
24
-
25
-
26
-
27
-
28
-
29
-
30
-
31
-
32
-
33
-
34
-
35
-
36
-
37
-
38
-
39
-
40
-
41
-
42
-
43
-
44
-
45
-
46
-
 47
47 -
 48
48 -
 49
49 -
 50
50 -
 51
51 -
 52
52 -
 53
53 -
 54
54 -
 55
55 -
 56
56 -
 57
57 -
58
-
59
-
60
-
61
-
62
-
63
-
64
-
65
-
66
-
67
-
68
-
69
-
70
-
71
-
72
-
73
-
74
 |
 |
