Pioneer AVH-4000NEX Owners Manual - Page 50
Touch [Demo Mode] repeatedly
 |
View all Pioneer AVH-4000NEX manuals
Add to My Manuals
Save this manual to your list of manuals |
Page 50 highlights
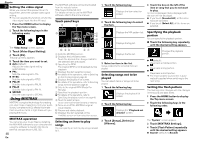
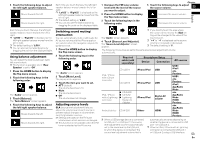
Chapter 22 Setting the camera for Camera View mode To display Camera View at all times, "Camera View" needs to be set to "On". p To set the rear view camera for Camera View mode, "Back Camera Input" needs to be set to "On". For details, refer to Setting rear view camera activation on page 49. 1 Press the HOME button to display the Top menu screen. 2 Touch the following keys in the following order. The "System" screen appears. 3 Touch [Camera settings]. 4 Touch [Camera View] repeatedly until the desired setting appears. Off (default): Turns the camera view setting off. On: Turns the camera view setting on. If no operations are performed for seven seconds after the AV operation screen is displayed, the camera view will appear automatically. p If you touch the screen while the camera view is displayed, the displayed image will turn off temporarily. 3 Touch [Camera settings]. 4 Touch [Parking assist guide] repeatedly until the desired setting appears. Off (default): Hides the guidelines. On: Displays the guidelines. When the shift lever is moved to the REVERSE (R) position after setting the rear view camera, the rear view image appears. p If you press and hold the MUTE button, the rear view image disappears. Setting guidelines on the rear view image CAUTION When adjusting the guidelines, be sure to park the vehicle in a safe place and apply the parking brake. Before getting out of the car to place the markings, be sure to turn the ignition switch off (ACC OFF). The range projected by the rear view camera is limited. Also, the vehicle width and distance guidelines displayed on the rear view camera image may differ from the actual vehicle width and distance. (The guidelines are straight lines.) The image quality may deteriorate depending on the usage environment, such as at night or in dark surroundings. 1 Park your vehicle in a safe place and apply the parking brake. Displaying the parking assist guidelines 1 Press the HOME button to display the Top menu screen. 2 Touch the following keys in the following order. 2 Using packing tape or similar, place markings approximately 25 cm from each side of the vehicle, and approximately 50 cm and 2 m from the rear bumper. 2 m (6 ft. 7 in.) Markings 50 cm (1 ft. 8 in.) 25 cm (9-7/8 in.) Markings 25 cm (9-7/8 in.) Rear bumper 3 Press the HOME button to display the Top menu screen. 4 Touch the following keys in the following order. Moves the point downward. Default Extends the line to the left and right from the current center point of the distance guideline. The adjustment points on the lateral coordinates at both ends will also move. Shortens the line from the left and right to the current center point of the distance guideline. The adjustment points on the lateral coordinates at both ends will also move. Resets the settings of the distance and vehicle width guidelines and adjustment points to the default. p When a point is moved, the distance from the initial value is displayed at the bottom of the screen. The "System" screen appears. 5 Touch [Camera settings]. 6 Touch [Parking assist guide adjust]. 7 Set the guidelines by dragging the four points. 8 Touch the following keys to adjust the position of the point if necessary. Moves the point to the left. Moves the point to the right. Moves the point upward. Turning off the demo screen If the demo screen appears, perform the following procedure to turn off the demo screen. 1 Press the HOME button to display the Top menu screen. 2 Touch the following keys in the following order. The "System" screen appears. 3 Touch [Demo Mode] repeatedly until the desired setting appears. Off (default): Hides the demo screen. On: Displays the demo screen. You can also turn off the demo screen by pressing and holding the MUTE button. 50 The "System" screen appears. En
-
 1
1 -
2
-
3
-
4
-
5
-
6
-
7
-
8
-
9
-
10
-
11
-
12
-
13
-
14
-
15
-
16
-
17
-
18
-
19
-
20
-
21
-
22
-
23
-
24
-
25
-
26
-
27
-
28
-
29
-
30
-
31
-
32
-
33
-
34
-
35
-
36
-
37
-
38
-
39
-
40
-
41
-
42
-
43
-
44
-
 45
45 -
 46
46 -
 47
47 -
 48
48 -
 49
49 -
 50
50 -
 51
51 -
 52
52 -
 53
53 -
 54
54 -
 55
55 -
56
-
57
-
58
-
59
-
60
-
61
-
62
-
63
-
64
-
65
-
66
-
67
-
68
-
69
-
70
-
71
-
72
-
73
-
74
-
75
-
76
-
77
-
78
-
79
-
80
-
81
-
82
-
83
-
84
-
85
-
86
-
87
-
88
-
89
-
90
-
91
-
92
-
93
-
94
-
95
-
96
-
97
-
98
-
99
-
100
-
101
-
102
-
103
-
104
-
105
-
106
-
107
-
108
-
109
-
110
-
111
-
112
-
113
-
114
-
115
-
116
-
117
-
118
-
119
-
120
-
121
-
122
-
123
-
124
-
125
-
126
-
127
-
128
-
129
-
130
-
131
-
132
-
133
-
134
-
135
-
136
-
137
-
138
-
139
-
140
-
141
-
142
-
143
-
144
-
145
-
146
-
147
-
148
-
149
-
150
-
151
-
152
-
153
-
154
-
155
-
156
-
157
-
158
-
159
-
160
-
161
-
162
-
163
-
164
-
165
-
166
-
167
-
168
-
169
-
170
-
171
-
172
-
173
-
174
-
175
-
176
-
177
-
178
-
179
-
180
-
181
-
182
-
183
-
184
-
185
-
186
-
187
-
188
-
189
-
190
-
191
-
192
-
193
-
194
-
195
-
196
-
197
-
198
-
199
-
200
-
201
-
202
-
203
-
204
-
205
-
206
-
207
-
208
-
209
-
210
-
211
-
212
-
213
-
214
-
215
-
216
-
217
-
218
-
219
-
220
-
221
-
222
-
223
-
224
-
225
-
226
-
227
-
228
-
229
-
230
-
231
-
232
-
233
-
234
-
235
-
236
-
237
-
238
-
239
-
240
-
241
-
242
-
243
-
244
-
245
-
246
-
247
-
248
-
249
-
250
-
251
-
252
-
253
-
254
-
255
-
256
-
257
-
258
-
259
-
260
-
261
-
262
-
263
-
264
-
265
-
266
-
267
-
268
-
269
-
270
-
271
-
272
-
273
-
274
-
275
-
276
 |
 |