Ricoh 2020D Operating Instructions - Page 24
Bypass tray
 |
View all Ricoh 2020D manuals
Add to My Manuals
Save this manual to your list of manuals |
Page 24 highlights
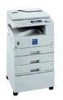
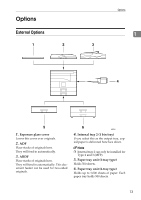
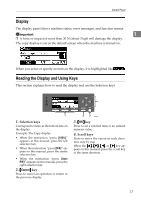
Getting Started 6. Main power switch 9. Operation switch If the machine does not operate after Press to turn the power on (the On indi- turning on the operation switch, check cator lights). To turn the power off, press the main power switch is turned on. If it again (the On indicator goes off). 1 is off, turn it on. 7. Main power indicator 10. Control panel See p.15 "Control Panel". Lights when the main power switch is turned on, and goes off when the switch is turned off. 11. Front cover Open to access the inside of the machine. 8. On indicator Lights when the operation switch is 12. Paper tray Load paper here. turned on, and goes off when the switch is turned off. 13. Paper tray unit (optional) See p.13 "External Options". Type 1 Type 2 Type 3 1. Bypass tray Use to copy onto OHP transparencies, adhesive labels, translucent paper, envelopes, and custom size paper. 2. Right cover Open this cover to remove jammed paper fed from the paper tray. 3. Lower right cover (Type 2 or 3 only) Open this cover to remove jammed paper fed from the paper tray unit. 4. Lower right cover Open this cover to remove jammed paper from the optional paper tray unit. Note ❒ This tray is for reversing paper when using the duplex function (Type 3 only). Do not pull the paper out from here. AAI032S 12
-
 1
1 -
2
-
3
-
4
-
5
-
6
-
7
-
8
-
9
-
10
-
11
-
12
-
13
-
14
-
15
-
16
-
17
-
18
-
 19
19 -
 20
20 -
 21
21 -
 22
22 -
 23
23 -
 24
24 -
 25
25 -
 26
26 -
 27
27 -
 28
28 -
 29
29 -
30
-
31
-
32
-
33
-
34
-
35
-
36
-
37
-
38
-
39
-
40
-
41
-
42
-
43
-
44
-
45
-
46
-
47
-
48
-
49
-
50
-
51
-
52
-
53
-
54
-
55
-
56
-
57
-
58
-
59
-
60
-
61
-
62
-
63
-
64
-
65
-
66
-
67
-
68
-
69
-
70
-
71
-
72
-
73
-
74
-
75
-
76
-
77
-
78
-
79
-
80
-
81
-
82
-
83
-
84
-
85
-
86
-
87
-
88
-
89
-
90
-
91
-
92
-
93
-
94
-
95
-
96
-
97
-
98
-
99
-
100
-
101
-
102
-
103
-
104
-
105
-
106
-
107
-
108
-
109
-
110
-
111
-
112
-
113
-
114
-
115
-
116
-
117
-
118
-
119
-
120
-
121
-
122
-
123
-
124
-
125
-
126
-
127
-
128
 |
 |
