Samsung Continuum i400 User Manual (user Manual) (ver.f5) (English) - Page 72
Corporate Email
 |
View all Samsung Continuum i400 manuals
Add to My Manuals
Save this manual to your list of manuals |
Page 72 highlights
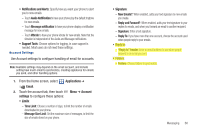
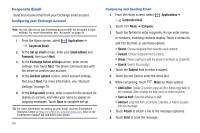
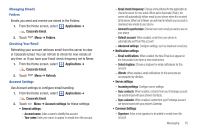
Corporate Email Send and receive email from your Exchange email account. Configuring your Exchange Account Note: You can also set up your Exchange account with the Accounts & Sync settings. For more information, see "Accounts" on page 44. 1. From the Home screen, select Corporate Email. Applications ➔ 2. At the Set up email screen, enter your Email address and Password, then touch Next. 3. At the Exchange Server settings screen, enter server settings, then touch Next. The phone communicates with the server to confirm your account. 4. At the Account options screen, select account settings, then touch Next. For more information, see "Account Settings" on page 70. 5. At the Set up email screen, enter a name for the account (to display on screen), and enter your name to appear on outgoing messages. Touch Done to complete set-up. Tip: For more information on setting up your email, visit the Smartphone Resource Center at https://smartphones.verizonwireless.com, click on the Smartphone Support tab and select your phone. 69 Composing and Sending Email 1. From the Home screen, select Corporate Email. Applications ➔ 2. Touch Menu ➔ Compose. 3. Touch the To field to enter recipients. As you enter names or numbers, matching contacts display. Touch a contact to add it to the field, or use these options: • Recent: Choose recipients from recently-used contacts. • Contact: Choose recipients from Contacts. • Group: Choose a group to add the group's members as recipients. • Search: Search for a contact. 4. Touch the Subject field to enter a subject. 5. Touch the text field to enter the email text. 6. While composing, touch Menu for these options: • Add Cc/Bcc: Create Cc (carbon copy) and Bcc (blind copy) fields in the message. After creating the field, touch to enter recipients. • Save as draft: Save the email as a draft. • Add text: Copy text from a Contacts, Calendar, or Memo to paste into this message. 7. Touch Attach to attach a file to the message (optional). 8. Touch Send to send the message.
-
 1
1 -
2
-
3
-
4
-
5
-
6
-
7
-
8
-
9
-
10
-
11
-
12
-
13
-
14
-
15
-
16
-
17
-
18
-
19
-
20
-
21
-
22
-
23
-
24
-
25
-
26
-
27
-
28
-
29
-
30
-
31
-
32
-
33
-
34
-
35
-
36
-
37
-
38
-
39
-
40
-
41
-
42
-
43
-
44
-
45
-
46
-
47
-
48
-
49
-
50
-
51
-
52
-
53
-
54
-
55
-
56
-
57
-
58
-
59
-
60
-
61
-
62
-
63
-
64
-
65
-
66
-
 67
67 -
 68
68 -
 69
69 -
 70
70 -
 71
71 -
 72
72 -
 73
73 -
 74
74 -
 75
75 -
 76
76 -
 77
77 -
78
-
79
-
80
-
81
-
82
-
83
-
84
-
85
-
86
-
87
-
88
-
89
-
90
-
91
-
92
-
93
-
94
-
95
-
96
-
97
-
98
-
99
-
100
-
101
-
102
-
103
-
104
-
105
-
106
-
107
-
108
-
109
-
110
-
111
-
112
-
113
-
114
-
115
-
116
-
117
-
118
-
119
-
120
-
121
-
122
-
123
-
124
-
125
-
126
-
127
-
128
-
129
-
130
-
131
-
132
-
133
-
134
-
135
-
136
-
137
-
138
-
139
-
140
-
141
-
142
-
143
-
144
-
145
-
146
-
147
-
148
-
149
-
150
-
151
-
152
-
153
-
154
-
155
-
156
-
157
-
158
-
159
-
160
-
161
-
162
-
163
-
164
-
165
-
166
-
167
-
168
-
169
-
170
-
171
-
172
-
173
-
174
-
175
-
176
-
177
-
178
-
179
-
180
-
181
-
182
-
183
 |
 |
