Samsung SRP-275CEPG Operation Manual - Page 22
Changing the DIP Switch setting
 |
View all Samsung SRP-275CEPG manuals
Add to My Manuals
Save this manual to your list of manuals |
Page 22 highlights
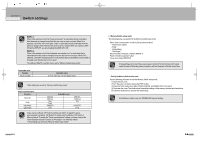
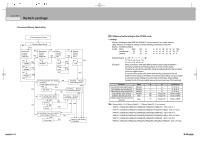
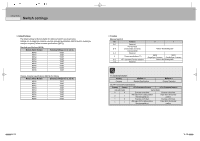
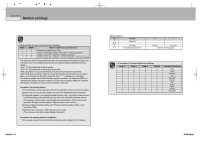
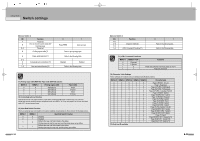
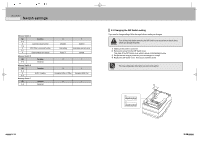
CHAPTER 3 Switch settings Memory Switch 4 Bit Function F~9 8 Automatic status function 7~4 3 ESC RS a n command function 2~1 0 Data reception error (serial) Memory Switch 5 Bit F~0 Function Reserved Memory Switch 6 Bit F~A 9 8~0 Memory Switch 7 Bit F~0 Function BUSY Condition Function Reserved 0 Disabled Only setting Prints "?" 0 1 Enabled Auto-status sent only once Ignored 1 0 1 Reception Buffer or Offline Reception Buffer Full 0 1 3.3 Changing the DIP Switch setting If you need to change settings, follow the steps below to make your changes. Turn off the printer before removing the DIP Switch cover to prevent an electric short, which can damage the printer. 1) Make sure the printer is turned off. 2) Remove the screw from the DIP Switch cover. Then take off the DIP Switch cover, which is shown in the illustration below. 3) Set the switches using a pointed tool, such as tweezers or a small. 4) Replace the DIP Switch cover. Then secure it with the screw. The new settings take effect when you turn on the printer. 3-18 3-19
-
 1
1 -
2
-
3
-
4
-
5
-
6
-
7
-
8
-
9
-
10
-
11
-
12
-
13
-
14
-
15
-
16
-
 17
17 -
 18
18 -
 19
19 -
 20
20 -
 21
21 -
 22
22 -
 23
23 -
 24
24 -
 25
25 -
 26
26 -
 27
27 -
28
-
29
-
30
-
31
-
32
-
33
-
34
-
35
-
36
-
37
-
38
-
39
-
40
-
41
-
42
-
43
-
44
-
45
-
46
-
47
-
48
-
49
-
50
-
51
-
52
-
53
-
54
-
55
-
56
-
57
-
58
-
59
-
60
-
61
-
62
-
63
-
64
-
65
-
66
-
67
-
68
-
69
-
70
-
71
-
72
-
73
-
74
-
75
-
76
-
77
-
78
-
79
-
80
-
81
-
82
-
83
-
84
-
85
-
86
-
87
-
88
-
89
-
90
-
91
-
92
-
93
-
94
-
95
-
96
-
97
-
98
-
99
-
100
-
101
-
102
-
103
-
104
-
105
-
106
-
107
-
108
-
109
-
110
 |
 |
