Samsung SRP-275CEPG Operation Manual - Page 8
Installing wall mount Option, 7 Changing the frame control paper position
 |
View all Samsung SRP-275CEPG manuals
Add to My Manuals
Save this manual to your list of manuals |
Page 8 highlights
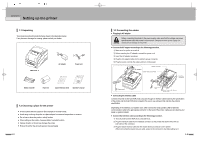
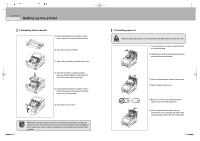
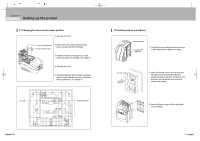
CHAPTER 1 Setting up the printer 1.7 Changing the frame control paper position 1) Open the rear cover. 2) Remove the frame control paper by loosing the two screws(3 x 6).(76 mm default) 3) Reattach the frame control paper in you want. (Insert and tighten two screws(3 x 6) to reattach.) 4) Close the rear cover. 5) Change the Memory Switch setting for changing paper roll width. (See the instructions "Setting the Memory Switches"(3.1) in Chapter 3.) 1.8 Installing wall mount (Option) 1) Turn the Set over and attach the Bracket hanger to the Frame base then tighten four screws. 2) Attach the Bracket mount to the wall firmly with the eight screws. Be sure that the Bracket attached properly to match the direction of arrow as shown. And the Bracket mount should be always fixed vertically. 3) Insert the Bracket hanger of Set to the Bracket mount as shown. 1-6 1-7
-
 1
1 -
2
-
 3
3 -
 4
4 -
 5
5 -
 6
6 -
 7
7 -
 8
8 -
 9
9 -
 10
10 -
 11
11 -
 12
12 -
 13
13 -
14
-
15
-
16
-
17
-
18
-
19
-
20
-
21
-
22
-
23
-
24
-
25
-
26
-
27
-
28
-
29
-
30
-
31
-
32
-
33
-
34
-
35
-
36
-
37
-
38
-
39
-
40
-
41
-
42
-
43
-
44
-
45
-
46
-
47
-
48
-
49
-
50
-
51
-
52
-
53
-
54
-
55
-
56
-
57
-
58
-
59
-
60
-
61
-
62
-
63
-
64
-
65
-
66
-
67
-
68
-
69
-
70
-
71
-
72
-
73
-
74
-
75
-
76
-
77
-
78
-
79
-
80
-
81
-
82
-
83
-
84
-
85
-
86
-
87
-
88
-
89
-
90
-
91
-
92
-
93
-
94
-
95
-
96
-
97
-
98
-
99
-
100
-
101
-
102
-
103
-
104
-
105
-
106
-
107
-
108
-
109
-
110
 |
 |
