Sony Ericsson R380 WORLD User Guide - Page 17
To set time, To set the date
 |
View all Sony Ericsson R380 WORLD manuals
Add to My Manuals
Save this manual to your list of manuals |
Page 17 highlights
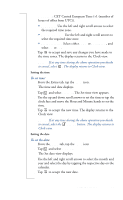
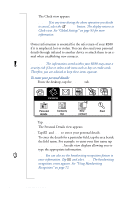
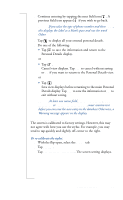
Zone name: CET Central European Time (+1 (number of hours of offset from UTC)). • Home zone: Use the left and right scroll arrows to select the required time zone. • Destination zone: Use the left and right scroll arrows to select the required time zone. • Daylight saving: Select either Home or Destination, and select On or Off. 4. Tap OK to accept and save any changes you have made to the time zones. The display returns to the Clock view. Note: If at any time during the above operation you decide to cancel, select . The display returns to Clock view. Setting the time To set time: 1. From the Extras tab, tap the Clock icon. The time and date displays. 2. Tap and select Set time. The Set time view appears. 3. Use the up and down scroll arrows to set the time or tap the clock face and move the Hour and Minute hands to set the time. 4. Tap OK to accept the new time. The display returns to the Clock view. Note: If at any time during the above operation you decide to cancel, select the Cancel button. The display returns to Clock view. Setting the date To set the date: 1. From the Extras tab, tap the Clock icon 2. Tap and select Set date. The Set date view displays. 3. Use the left and right scroll arrows to select the month and year and select the day by tapping the respective day on the calendar. 4. Tap OK to accept the new date. Preparing for Use 17
-
 1
1 -
2
-
3
-
4
-
5
-
6
-
7
-
8
-
9
-
10
-
11
-
 12
12 -
 13
13 -
 14
14 -
 15
15 -
 16
16 -
 17
17 -
 18
18 -
 19
19 -
 20
20 -
 21
21 -
 22
22 -
23
-
24
-
25
-
26
-
27
-
28
-
29
-
30
-
31
-
32
-
33
-
34
-
35
-
36
-
37
-
38
-
39
-
40
-
41
-
42
-
43
-
44
-
45
-
46
-
47
-
48
-
49
-
50
-
51
-
52
-
53
-
54
-
55
-
56
-
57
-
58
-
59
-
60
-
61
-
62
-
63
-
64
-
65
-
66
-
67
-
68
-
69
-
70
-
71
-
72
-
73
-
74
-
75
-
76
-
77
-
78
-
79
-
80
-
81
-
82
-
83
-
84
-
85
-
86
-
87
-
88
-
89
-
90
-
91
-
92
-
93
-
94
-
95
-
96
-
97
-
98
-
99
-
100
-
101
-
102
-
103
-
104
-
105
-
106
-
107
-
108
-
109
-
110
-
111
-
112
-
113
-
114
-
115
-
116
-
117
-
118
-
119
-
120
-
121
-
122
-
123
-
124
-
125
-
126
-
127
-
128
-
129
-
130
-
131
-
132
-
133
-
134
-
135
-
136
-
137
-
138
-
139
-
140
-
141
-
142
-
143
-
144
-
145
-
146
-
147
-
148
-
149
-
150
-
151
-
152
-
153
-
154
-
155
-
156
-
157
-
158
-
159
-
160
-
161
-
162
-
163
-
164
-
165
-
166
-
167
-
168
-
169
-
170
-
171
-
172
-
173
-
174
-
175
-
176
-
177
-
178
-
179
-
180
-
181
-
182
-
183
-
184
-
185
-
186
-
187
-
188
-
189
-
190
-
191
-
192
-
193
-
194
-
195
-
196
-
197
-
198
-
199
-
200
-
201
-
202
-
203
-
204
-
205
-
206
-
207
-
208
-
209
-
210
-
211
-
212
-
213
-
214
-
215
-
216
-
217
-
218
-
219
-
220
-
221
-
222
-
223
-
224
-
225
-
226
-
227
-
228
-
229
-
230
-
231
-
232
-
233
-
234
-
235
-
236
-
237
-
238
-
239
-
240
-
241
-
242
-
243
-
244
-
245
-
246
-
247
-
248
-
249
-
250
-
251
-
252
-
253
-
254
-
255
-
256
-
257
 |
 |
