Sony Ericsson R380 WORLD User Guide - Page 189
If you have more than one e-mail account, you are
 |
View all Sony Ericsson R380 WORLD manuals
Add to My Manuals
Save this manual to your list of manuals |
Page 189 highlights
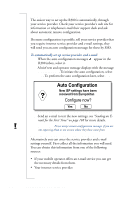
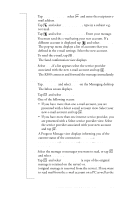
2. Tap select abc and enter the recipients email address. 3. Tap and select , type in a subject e.g. test mail. 4. Tap and select . Enter your message. 5. You must send the e-mail using your new account. If a different account is displayed tap and select Account:. The pop-up menu displays a list of accounts that you defined in the e-mail settings. Select the new account. 6. To send the e-mail, tap OK . The Send confirmation view displays. 7. Select Yes, if a list appears select the service provider associated with the new e-mail account and tap OK . The R380 connects and forward the message immediately. Connecting and Reading the Inbox for the First Time 1. Tap Messaging and select Inbox on the Messaging desktop. The Inbox screen displays. 2. Tap and select Connect. 3. One of the following occurs: • If you have more than one e-mail account, you are presented with a Select e-mail account view. Select your new e-mail account and tap OK . • If you have more than one internet service provider, you are presented with a Select service provider view. Select the service provider associated with your new account and tap OK . A Progress Message view displays informing you of the current status of the connection: Dialing....; Authenticating...; Connecting....; Sending....Getting Headers. 4. Select the message or messages you want to read, or tap and select Select all. 5. Tap and select Copy to inbox (a copy of the original message is retained on the server) or Move to inbox (original message is removed from the server). If you want to read mail from the e-mail account on a PC as well as the Getting started with E-mail and WAP 189
-
 1
1 -
2
-
3
-
4
-
5
-
6
-
7
-
8
-
9
-
10
-
11
-
12
-
13
-
14
-
15
-
16
-
17
-
18
-
19
-
20
-
21
-
22
-
23
-
24
-
25
-
26
-
27
-
28
-
29
-
30
-
31
-
32
-
33
-
34
-
35
-
36
-
37
-
38
-
39
-
40
-
41
-
42
-
43
-
44
-
45
-
46
-
47
-
48
-
49
-
50
-
51
-
52
-
53
-
54
-
55
-
56
-
57
-
58
-
59
-
60
-
61
-
62
-
63
-
64
-
65
-
66
-
67
-
68
-
69
-
70
-
71
-
72
-
73
-
74
-
75
-
76
-
77
-
78
-
79
-
80
-
81
-
82
-
83
-
84
-
85
-
86
-
87
-
88
-
89
-
90
-
91
-
92
-
93
-
94
-
95
-
96
-
97
-
98
-
99
-
100
-
101
-
102
-
103
-
104
-
105
-
106
-
107
-
108
-
109
-
110
-
111
-
112
-
113
-
114
-
115
-
116
-
117
-
118
-
119
-
120
-
121
-
122
-
123
-
124
-
125
-
126
-
127
-
128
-
129
-
130
-
131
-
132
-
133
-
134
-
135
-
136
-
137
-
138
-
139
-
140
-
141
-
142
-
143
-
144
-
145
-
146
-
147
-
148
-
149
-
150
-
151
-
152
-
153
-
154
-
155
-
156
-
157
-
158
-
159
-
160
-
161
-
162
-
163
-
164
-
165
-
166
-
167
-
168
-
169
-
170
-
171
-
172
-
173
-
174
-
175
-
176
-
177
-
178
-
179
-
180
-
181
-
182
-
183
-
 184
184 -
 185
185 -
 186
186 -
 187
187 -
 188
188 -
 189
189 -
 190
190 -
 191
191 -
 192
192 -
 193
193 -
 194
194 -
195
-
196
-
197
-
198
-
199
-
200
-
201
-
202
-
203
-
204
-
205
-
206
-
207
-
208
-
209
-
210
-
211
-
212
-
213
-
214
-
215
-
216
-
217
-
218
-
219
-
220
-
221
-
222
-
223
-
224
-
225
-
226
-
227
-
228
-
229
-
230
-
231
-
232
-
233
-
234
-
235
-
236
-
237
-
238
-
239
-
240
-
241
-
242
-
243
-
244
-
245
-
246
-
247
-
248
-
249
-
250
-
251
-
252
-
253
-
254
-
255
-
256
-
257
 |
 |
