Sony Ericsson Xperia PLAY User Guide - Page 79
Working with photos, Share, Delete, Confirm, Slideshow, Rotate Left, Rotate Right, Set - camera zoom
 |
View all Sony Ericsson Xperia PLAY manuals
Add to My Manuals
Save this manual to your list of manuals |
Page 79 highlights
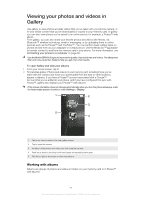
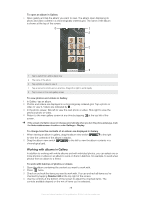
To share an album 1 Open the main gallery window. 2 Press twice. 3 Check the albums you want to share. 4 Tap Share at the bottom of the screen. 5 In the menu that opens, tap the application you want to use to share the selected albums. The application that you selected opens with the photos or videos from the selected albums or links, attached to a new message. If you are sharing an album via Gmail™, do not delete the original of an attachment before the message is completely sent. Otherwise, the attachment will not be sent. To delete an album 1 Open the main gallery window. 2 Press twice. 3 Check or uncheck the albums you want to delete. 4 Tap Delete at the bottom of the screen. In the dialog that opens, tap Confirm Delete. Working with photos Use gallery to view photos that you've taken with the camera, downloaded, copied onto your memory card, or stored in online web albums. You can also edit the photos on your memory card and share them with friends. To view photos 1 Open an album in Gallery, and tap a photo. 2 Flick left to view the next photo in the album. Flick right to view the previous photo. To zoom a photo 1 When you are viewing a photo in the photo viewer, tap the photo to display the zoom controls. 2 Tap one of the zoom controls. You can also double-tap a photo, or pinch two fingers together or spread them apart to zoom it in or out. Then drag the photo to view different parts of it. To watch a slideshow of your photos 1 In the photo viewer, tap a photo to view the controls. 2 Tap Slideshow. 3 Tap a photo to end the slideshow. To rotate a photo 1 When you are viewing a photo in the photo viewer, tap the photo to view the controls. 2 Tap Menu > More. 3 Tap Rotate Left or Rotate Right. The photo is saved with the new orientation. To use a photo as a contact picture 1 When you are viewing a photo in the photo viewer, tap the screen to display the controls. 2 In the toolbar at the bottom of the screen, tap Menu > More > Set as. 3 Tap Contact picture. 4 Select the contact you want to associate with the photo. 5 Crop the photo if required. 6 Tap Save. 79 This is an Internet version of this publication. © Print only for private use.
-
 1
1 -
2
-
3
-
4
-
5
-
6
-
7
-
8
-
9
-
10
-
11
-
12
-
13
-
14
-
15
-
16
-
17
-
18
-
19
-
20
-
21
-
22
-
23
-
24
-
25
-
26
-
27
-
28
-
29
-
30
-
31
-
32
-
33
-
34
-
35
-
36
-
37
-
38
-
39
-
40
-
41
-
42
-
43
-
44
-
45
-
46
-
47
-
48
-
49
-
50
-
51
-
52
-
53
-
54
-
55
-
56
-
57
-
58
-
59
-
60
-
61
-
62
-
63
-
64
-
65
-
66
-
67
-
68
-
69
-
70
-
71
-
72
-
73
-
 74
74 -
 75
75 -
 76
76 -
 77
77 -
 78
78 -
 79
79 -
 80
80 -
 81
81 -
 82
82 -
 83
83 -
 84
84 -
85
-
86
-
87
-
88
-
89
-
90
-
91
-
92
-
93
-
94
-
95
-
96
-
97
-
98
-
99
-
100
-
101
-
102
-
103
-
104
-
105
 |
 |
