Sony DCR-TRV50 Operating Instructions (primary manual) - Page 108
Adding audio on a recorded tape, Audio dubbing
 |
View all Sony DCR-TRV50 manuals
Add to My Manuals
Save this manual to your list of manuals |
Page 108 highlights
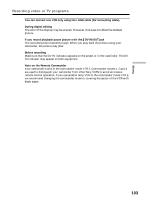
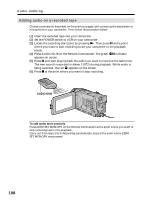
Audio dubbing Adding audio on a recorded tape Choose a connection described on the previous pages, and connect audio equipment or microphone to your camcorder. Then follow the procedure below. (1) Insert the recorded tape into your camcorder. (2) Set the POWER switch to VCR on your camcorder. (3) Locate the recording start point by pressing N. Then press X at the point where you want to start recording to set your camcorder to the playback pause. (4) Press AUDIO DUB on the Remote Commander. The green X indicator appears on screen. (5) Press X and start playing back the audio you want to record at the same time. The new sound is recorded in stereo 2 (ST2) during playback. While audio is being recorded, the red appears on the screen. (6) Press x at the point where you want to stop recording. AUDIO DUB To add audio more precisely Press ZERO SET MEMORY on the Remote Commander at the point where you want to stop recording later in the playback. Carry out from steps 3 to 5. Recording automatically stops at the point where ZERO SET MEMORY was pressed. 108
-
 1
1 -
2
-
3
-
4
-
5
-
6
-
7
-
8
-
9
-
10
-
11
-
12
-
13
-
14
-
15
-
16
-
17
-
18
-
19
-
20
-
21
-
22
-
23
-
24
-
25
-
26
-
27
-
28
-
29
-
30
-
31
-
32
-
33
-
34
-
35
-
36
-
37
-
38
-
39
-
40
-
41
-
42
-
43
-
44
-
45
-
46
-
47
-
48
-
49
-
50
-
51
-
52
-
53
-
54
-
55
-
56
-
57
-
58
-
59
-
60
-
61
-
62
-
63
-
64
-
65
-
66
-
67
-
68
-
69
-
70
-
71
-
72
-
73
-
74
-
75
-
76
-
77
-
78
-
79
-
80
-
81
-
82
-
83
-
84
-
85
-
86
-
87
-
88
-
89
-
90
-
91
-
92
-
93
-
94
-
95
-
96
-
97
-
98
-
99
-
100
-
101
-
102
-
 103
103 -
 104
104 -
 105
105 -
 106
106 -
 107
107 -
 108
108 -
 109
109 -
 110
110 -
 111
111 -
 112
112 -
 113
113 -
114
-
115
-
116
-
117
-
118
-
119
-
120
-
121
-
122
-
123
-
124
-
125
-
126
-
127
-
128
-
129
-
130
-
131
-
132
-
133
-
134
-
135
-
136
-
137
-
138
-
139
-
140
-
141
-
142
-
143
-
144
-
145
-
146
-
147
-
148
-
149
-
150
-
151
-
152
-
153
-
154
-
155
-
156
-
157
-
158
-
159
-
160
-
161
-
162
-
163
-
164
-
165
-
166
-
167
-
168
-
169
-
170
-
171
-
172
-
173
-
174
-
175
-
176
-
177
-
178
-
179
-
180
-
181
-
182
-
183
-
184
-
185
-
186
-
187
-
188
-
189
-
190
-
191
-
192
-
193
-
194
-
195
-
196
-
197
-
198
-
199
-
200
-
201
-
202
-
203
-
204
-
205
-
206
-
207
-
208
-
209
-
210
-
211
-
212
-
213
-
214
-
215
-
216
-
217
-
218
-
219
-
220
-
221
-
222
-
223
-
224
-
225
-
226
-
227
-
228
-
229
-
230
-
231
-
232
-
233
-
234
-
235
-
236
-
237
-
238
-
239
-
240
-
241
-
242
-
243
-
244
-
245
-
246
-
247
-
248
 |
 |