Sony DCR-TRV50 Operating Instructions (primary manual) - Page 109
Audio dubbing, Monitoring the new recorded sound
 |
View all Sony DCR-TRV50 manuals
Add to My Manuals
Save this manual to your list of manuals |
Page 109 highlights
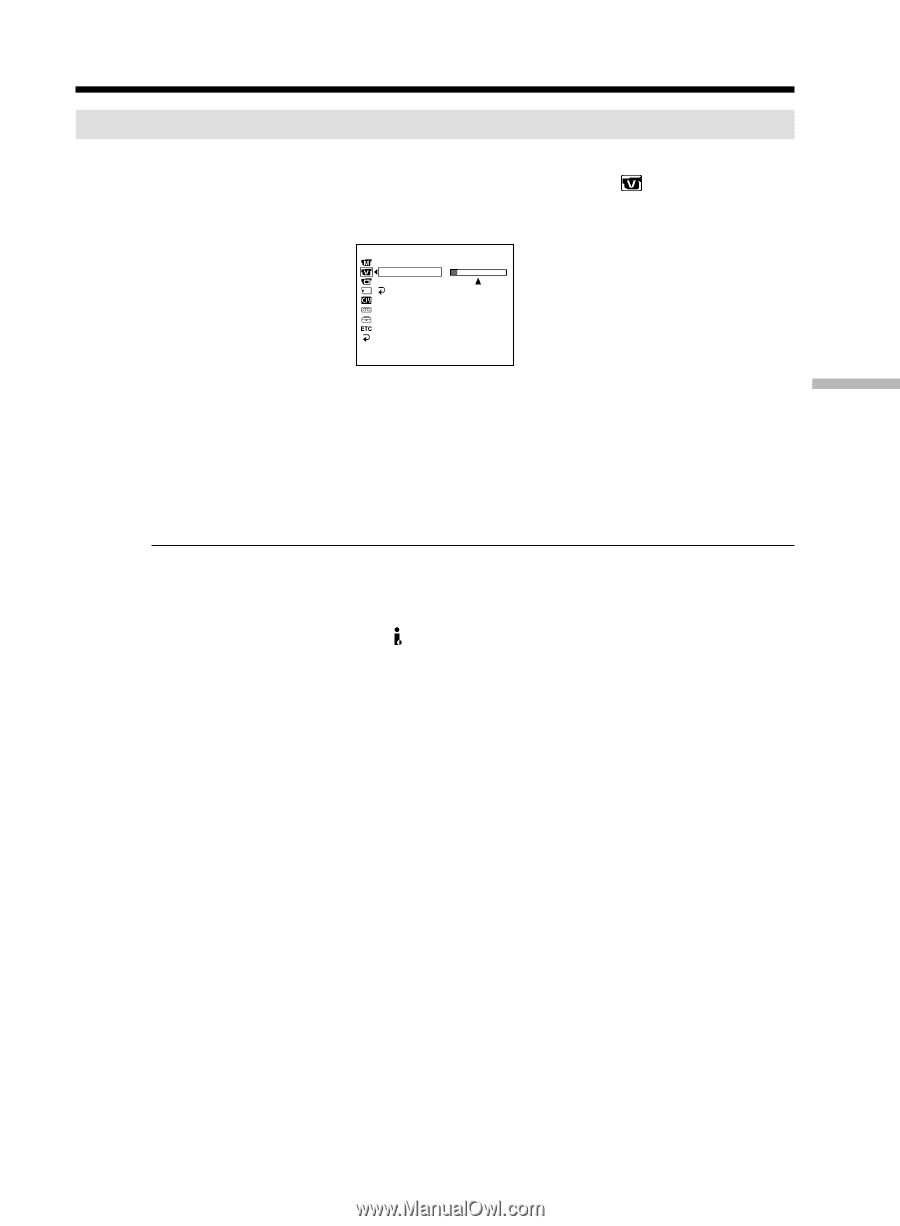
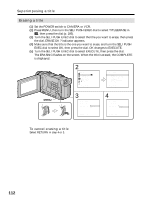
Editing Audio dubbing Monitoring the new recorded sound (1) Play back the tape on which you added audio. (2) Turn the SEL/PUSH EXEC dial to select AUDIO MIX in settings, then press the dial. in the menu VCR SET HiFi SOUND AUDIO MIX A/VcDV OUT ST1 ST2 RETURN [MENU] : END (3) Turn the SEL/PUSH EXEC dial to adjust the balance between the original sound (ST1) and the new sound (ST2), then press the dial. Five minutes after you disconnect the power supply or remove the battery pack, the AUDIO MIX setting returns to original sound (ST1) only. The default setting is original sound only. Notes • New audio cannot be recorded on a tape already recorded in the 16-bit mode (32 kHz, 44.1 kHz or 48 kHz). • New audio cannot be recorded on a tape already recorded in the LP mode. • You cannot add audio with the DV IN/OUT jack. • You cannot add audio on the blank portion of the tape. If an i.LINK cable (DV connecting cable) (optional) is connected to your camcorder You cannot add audio to a recorded tape. We recommend that you add audio on a tape recorded with your camcorder If you add audio on a tape recorded with another camcorder (including other DCR-TRV40/TRV50), the sound quality may become worse. If you set the write-protect tab of the cassette to lock You cannot record on a tape. Slide the write-protect tab to release the write protection. 109
-
 1
1 -
2
-
3
-
4
-
5
-
6
-
7
-
8
-
9
-
10
-
11
-
12
-
13
-
14
-
15
-
16
-
17
-
18
-
19
-
20
-
21
-
22
-
23
-
24
-
25
-
26
-
27
-
28
-
29
-
30
-
31
-
32
-
33
-
34
-
35
-
36
-
37
-
38
-
39
-
40
-
41
-
42
-
43
-
44
-
45
-
46
-
47
-
48
-
49
-
50
-
51
-
52
-
53
-
54
-
55
-
56
-
57
-
58
-
59
-
60
-
61
-
62
-
63
-
64
-
65
-
66
-
67
-
68
-
69
-
70
-
71
-
72
-
73
-
74
-
75
-
76
-
77
-
78
-
79
-
80
-
81
-
82
-
83
-
84
-
85
-
86
-
87
-
88
-
89
-
90
-
91
-
92
-
93
-
94
-
95
-
96
-
97
-
98
-
99
-
100
-
101
-
102
-
103
-
 104
104 -
 105
105 -
 106
106 -
 107
107 -
 108
108 -
 109
109 -
 110
110 -
 111
111 -
 112
112 -
 113
113 -
 114
114 -
115
-
116
-
117
-
118
-
119
-
120
-
121
-
122
-
123
-
124
-
125
-
126
-
127
-
128
-
129
-
130
-
131
-
132
-
133
-
134
-
135
-
136
-
137
-
138
-
139
-
140
-
141
-
142
-
143
-
144
-
145
-
146
-
147
-
148
-
149
-
150
-
151
-
152
-
153
-
154
-
155
-
156
-
157
-
158
-
159
-
160
-
161
-
162
-
163
-
164
-
165
-
166
-
167
-
168
-
169
-
170
-
171
-
172
-
173
-
174
-
175
-
176
-
177
-
178
-
179
-
180
-
181
-
182
-
183
-
184
-
185
-
186
-
187
-
188
-
189
-
190
-
191
-
192
-
193
-
194
-
195
-
196
-
197
-
198
-
199
-
200
-
201
-
202
-
203
-
204
-
205
-
206
-
207
-
208
-
209
-
210
-
211
-
212
-
213
-
214
-
215
-
216
-
217
-
218
-
219
-
220
-
221
-
222
-
223
-
224
-
225
-
226
-
227
-
228
-
229
-
230
-
231
-
232
-
233
-
234
-
235
-
236
-
237
-
238
-
239
-
240
-
241
-
242
-
243
-
244
-
245
-
246
-
247
-
248
 |
 |