Sony DCR-TRV50 Operating Instructions (primary manual) - Page 230
Adjusting the LCD screen CALIBRATION, Maintenance information and precautions
 |
View all Sony DCR-TRV50 manuals
Add to My Manuals
Save this manual to your list of manuals |
Page 230 highlights
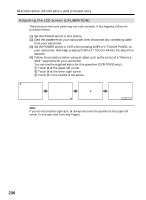
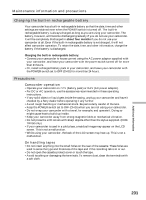
Maintenance information and precautions Adjusting the LCD screen (CALIBRATION) The buttons on the touch panel may not work correctly. If this happens, follow the procedure below. (1) Set the POWER switch to OFF (CHG). (2) Eject the cassette from your camcorder, then disconnect any connecting cable from your camcorder. (3) Set the POWER switch to VCR while pressing DISPLAY/TOUCH PANEL on your camcorder, then keep pressing DISPLAY/TOUCH PANEL for about five seconds. (4) Follow the procedure below using an object such as the corner of a "Memory Stick" supplied with your camcorder. You can use the supplied stylus for this operation (DCR-TRV50 only). 1 Touch at the upper left corner. 2 Touch at the lower right corner. 3 Touch in the middle of the screen. CALIBRATE CALIBRATE CALIBRATE PB INDEX FN Note If you do not press the right spot, always returns to the position at the upper left corner. In this case, start from step 4 again. 230
-
 1
1 -
2
-
3
-
4
-
5
-
6
-
7
-
8
-
9
-
10
-
11
-
12
-
13
-
14
-
15
-
16
-
17
-
18
-
19
-
20
-
21
-
22
-
23
-
24
-
25
-
26
-
27
-
28
-
29
-
30
-
31
-
32
-
33
-
34
-
35
-
36
-
37
-
38
-
39
-
40
-
41
-
42
-
43
-
44
-
45
-
46
-
47
-
48
-
49
-
50
-
51
-
52
-
53
-
54
-
55
-
56
-
57
-
58
-
59
-
60
-
61
-
62
-
63
-
64
-
65
-
66
-
67
-
68
-
69
-
70
-
71
-
72
-
73
-
74
-
75
-
76
-
77
-
78
-
79
-
80
-
81
-
82
-
83
-
84
-
85
-
86
-
87
-
88
-
89
-
90
-
91
-
92
-
93
-
94
-
95
-
96
-
97
-
98
-
99
-
100
-
101
-
102
-
103
-
104
-
105
-
106
-
107
-
108
-
109
-
110
-
111
-
112
-
113
-
114
-
115
-
116
-
117
-
118
-
119
-
120
-
121
-
122
-
123
-
124
-
125
-
126
-
127
-
128
-
129
-
130
-
131
-
132
-
133
-
134
-
135
-
136
-
137
-
138
-
139
-
140
-
141
-
142
-
143
-
144
-
145
-
146
-
147
-
148
-
149
-
150
-
151
-
152
-
153
-
154
-
155
-
156
-
157
-
158
-
159
-
160
-
161
-
162
-
163
-
164
-
165
-
166
-
167
-
168
-
169
-
170
-
171
-
172
-
173
-
174
-
175
-
176
-
177
-
178
-
179
-
180
-
181
-
182
-
183
-
184
-
185
-
186
-
187
-
188
-
189
-
190
-
191
-
192
-
193
-
194
-
195
-
196
-
197
-
198
-
199
-
200
-
201
-
202
-
203
-
204
-
205
-
206
-
207
-
208
-
209
-
210
-
211
-
212
-
213
-
214
-
215
-
216
-
217
-
218
-
219
-
220
-
221
-
222
-
223
-
224
-
 225
225 -
 226
226 -
 227
227 -
 228
228 -
 229
229 -
 230
230 -
 231
231 -
 232
232 -
 233
233 -
 234
234 -
 235
235 -
236
-
237
-
238
-
239
-
240
-
241
-
242
-
243
-
244
-
245
-
246
-
247
-
248
 |
 |
