Sony DCR-TRV50 Operating Instructions (primary manual) - Page 96
Notes
 |
View all Sony DCR-TRV50 manuals
Add to My Manuals
Save this manual to your list of manuals |
Page 96 highlights
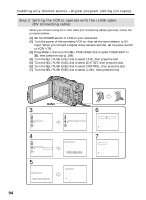
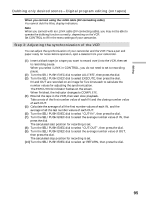
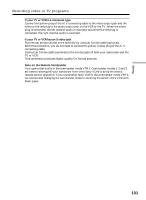
Dubbing only desired scenes - Digital program editing (on tapes) 2,3 VIDEO EDIT 0:08:55:06 EDIT SET CONTROL ADJ TEST RETURN "CUT-IN" EXECUTE "CUT-OUT" IR SETUP ENGAGE PAUSEMODE REC PAUSE IR TEST RETURN [ME VIDEO EDIT 0:08:55:06 EDIT SET CONTROL ADJ TEST EXECUTING "CUT-IN" "CUT-OUT" No. 5 IR SETUP IN PAUSEMODE -60 IR TEST RETURN [ME VIDEO EDIT 0:08:55:06 EDIT SET CONTROL ADJ TEST COMPLETE "CUT-IN" "CUT-OUT" IR SETUP PAUSEMODE IR TEST RETURN [MENU] : END 6 8 VIDEO EDIT EDIT SET CONTROL ADJ TEST "CUT-IN" "CUT-OUT" IR SETUP PAUSEMODE IR TEST RETURN [MENU] : END 0:08:55:06 0 VIDEO EDIT EDIT SET CONTROL ADJ TEST "CUT-IN" "CUT-OUT" IR SETUP PAUSEMODE IR TEST RETURN [MENU] : END 0:08:55:06 0 Notes • When you complete step 3, the image used to adjust the synchronization is recorded for about 50 seconds. • If you start recording from the very beginning of the tape, the first few seconds of the tape may not record properly. Be sure to allow about 10 seconds' lead before starting recording. • When you connect with an i.LINK cable (DV connecting cable) you may not be able to operate the dubbing function correctly, depending on the VCR. Keep the i.LINK connection, and set CONTROL to IR in the menu settings. Video and audio are sent by digital signals. 96
-
 1
1 -
2
-
3
-
4
-
5
-
6
-
7
-
8
-
9
-
10
-
11
-
12
-
13
-
14
-
15
-
16
-
17
-
18
-
19
-
20
-
21
-
22
-
23
-
24
-
25
-
26
-
27
-
28
-
29
-
30
-
31
-
32
-
33
-
34
-
35
-
36
-
37
-
38
-
39
-
40
-
41
-
42
-
43
-
44
-
45
-
46
-
47
-
48
-
49
-
50
-
51
-
52
-
53
-
54
-
55
-
56
-
57
-
58
-
59
-
60
-
61
-
62
-
63
-
64
-
65
-
66
-
67
-
68
-
69
-
70
-
71
-
72
-
73
-
74
-
75
-
76
-
77
-
78
-
79
-
80
-
81
-
82
-
83
-
84
-
85
-
86
-
87
-
88
-
89
-
90
-
 91
91 -
 92
92 -
 93
93 -
 94
94 -
 95
95 -
 96
96 -
 97
97 -
 98
98 -
 99
99 -
 100
100 -
 101
101 -
102
-
103
-
104
-
105
-
106
-
107
-
108
-
109
-
110
-
111
-
112
-
113
-
114
-
115
-
116
-
117
-
118
-
119
-
120
-
121
-
122
-
123
-
124
-
125
-
126
-
127
-
128
-
129
-
130
-
131
-
132
-
133
-
134
-
135
-
136
-
137
-
138
-
139
-
140
-
141
-
142
-
143
-
144
-
145
-
146
-
147
-
148
-
149
-
150
-
151
-
152
-
153
-
154
-
155
-
156
-
157
-
158
-
159
-
160
-
161
-
162
-
163
-
164
-
165
-
166
-
167
-
168
-
169
-
170
-
171
-
172
-
173
-
174
-
175
-
176
-
177
-
178
-
179
-
180
-
181
-
182
-
183
-
184
-
185
-
186
-
187
-
188
-
189
-
190
-
191
-
192
-
193
-
194
-
195
-
196
-
197
-
198
-
199
-
200
-
201
-
202
-
203
-
204
-
205
-
206
-
207
-
208
-
209
-
210
-
211
-
212
-
213
-
214
-
215
-
216
-
217
-
218
-
219
-
220
-
221
-
222
-
223
-
224
-
225
-
226
-
227
-
228
-
229
-
230
-
231
-
232
-
233
-
234
-
235
-
236
-
237
-
238
-
239
-
240
-
241
-
242
-
243
-
244
-
245
-
246
-
247
-
248
 |
 |
