Sony DSC-RX100M5 Help Guide Printable PDF - Page 145
Auto Dual Rec
 |
View all Sony DSC-RX100M5 manuals
Add to My Manuals
Save this manual to your list of manuals |
Page 145 highlights
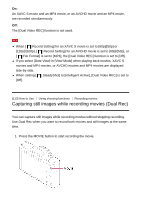
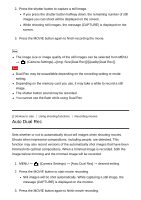
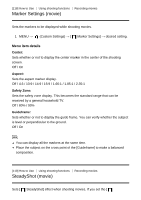
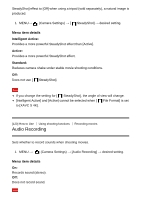
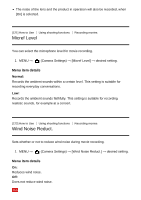
2. Press the shutter button to capture a still image. If you press the shutter button halfway down, the remaining number of still images you can shoot will be displayed on the screen. While shooting still images, the message [CAPTURE] is displayed on the screen. 3. Press the MOVIE button again to finish recording the movie. Hint The image size or image quality of the still images can be selected from MENU → (Camera Settings)→[Img. Size(Dual Rec)]/[Quality(Dual Rec)]. Note Dual Rec may be unavailable depending on the recording setting or mode setting. Depending on the memory card you use, it may take a while to record a still image. The shutter button sound may be recorded. You cannot use the flash while using Dual Rec. [114] How to Use Using shooting functions Recording movies Auto Dual Rec Sets whether or not to automatically shoot still images when shooting movies. Shoots when impressive compositions, including people, are detected. This function may also record versions of the automatically shot images that have been trimmed into optimal compositions. When a trimmed image is recorded, both the image before trimming and the trimmed image will be recorded. 1. MENU → (Camera Settings) → [Auto Dual Rec] → desired setting. 2. Press the MOVIE button to start movie recording. Still images will be shot automatically. While capturing a still image, the message [CAPTURE] is displayed on the monitor. 3. Press the MOVIE button again to finish movie recording.
-
 1
1 -
2
-
3
-
4
-
5
-
6
-
7
-
8
-
9
-
10
-
11
-
12
-
13
-
14
-
15
-
16
-
17
-
18
-
19
-
20
-
21
-
22
-
23
-
24
-
25
-
26
-
27
-
28
-
29
-
30
-
31
-
32
-
33
-
34
-
35
-
36
-
37
-
38
-
39
-
40
-
41
-
42
-
43
-
44
-
45
-
46
-
47
-
48
-
49
-
50
-
51
-
52
-
53
-
54
-
55
-
56
-
57
-
58
-
59
-
60
-
61
-
62
-
63
-
64
-
65
-
66
-
67
-
68
-
69
-
70
-
71
-
72
-
73
-
74
-
75
-
76
-
77
-
78
-
79
-
80
-
81
-
82
-
83
-
84
-
85
-
86
-
87
-
88
-
89
-
90
-
91
-
92
-
93
-
94
-
95
-
96
-
97
-
98
-
99
-
100
-
101
-
102
-
103
-
104
-
105
-
106
-
107
-
108
-
109
-
110
-
111
-
112
-
113
-
114
-
115
-
116
-
117
-
118
-
119
-
120
-
121
-
122
-
123
-
124
-
125
-
126
-
127
-
128
-
129
-
130
-
131
-
132
-
133
-
134
-
135
-
136
-
137
-
138
-
139
-
 140
140 -
 141
141 -
 142
142 -
 143
143 -
 144
144 -
 145
145 -
 146
146 -
 147
147 -
 148
148 -
 149
149 -
 150
150 -
151
-
152
-
153
-
154
-
155
-
156
-
157
-
158
-
159
-
160
-
161
-
162
-
163
-
164
-
165
-
166
-
167
-
168
-
169
-
170
-
171
-
172
-
173
-
174
-
175
-
176
-
177
-
178
-
179
-
180
-
181
-
182
-
183
-
184
-
185
-
186
-
187
-
188
-
189
-
190
-
191
-
192
-
193
-
194
-
195
-
196
-
197
-
198
-
199
-
200
-
201
-
202
-
203
-
204
-
205
-
206
-
207
-
208
-
209
-
210
-
211
-
212
-
213
-
214
-
215
-
216
-
217
-
218
-
219
-
220
-
221
-
222
-
223
-
224
-
225
-
226
-
227
-
228
-
229
-
230
-
231
-
232
-
233
-
234
-
235
-
236
-
237
-
238
-
239
-
240
-
241
-
242
-
243
-
244
-
245
-
246
-
247
-
248
-
249
-
250
-
251
-
252
-
253
-
254
-
255
-
256
-
257
-
258
-
259
-
260
-
261
-
262
-
263
-
264
-
265
-
266
-
267
-
268
-
269
-
270
-
271
-
272
-
273
-
274
-
275
-
276
-
277
-
278
-
279
-
280
-
281
-
282
-
283
-
284
-
285
-
286
-
287
-
288
-
289
-
290
-
291
-
292
-
293
-
294
-
295
-
296
-
297
-
298
-
299
-
300
-
301
-
302
-
303
 |
 |