Sony LSPX-P1 Help Guide Printable PDF - Page 9
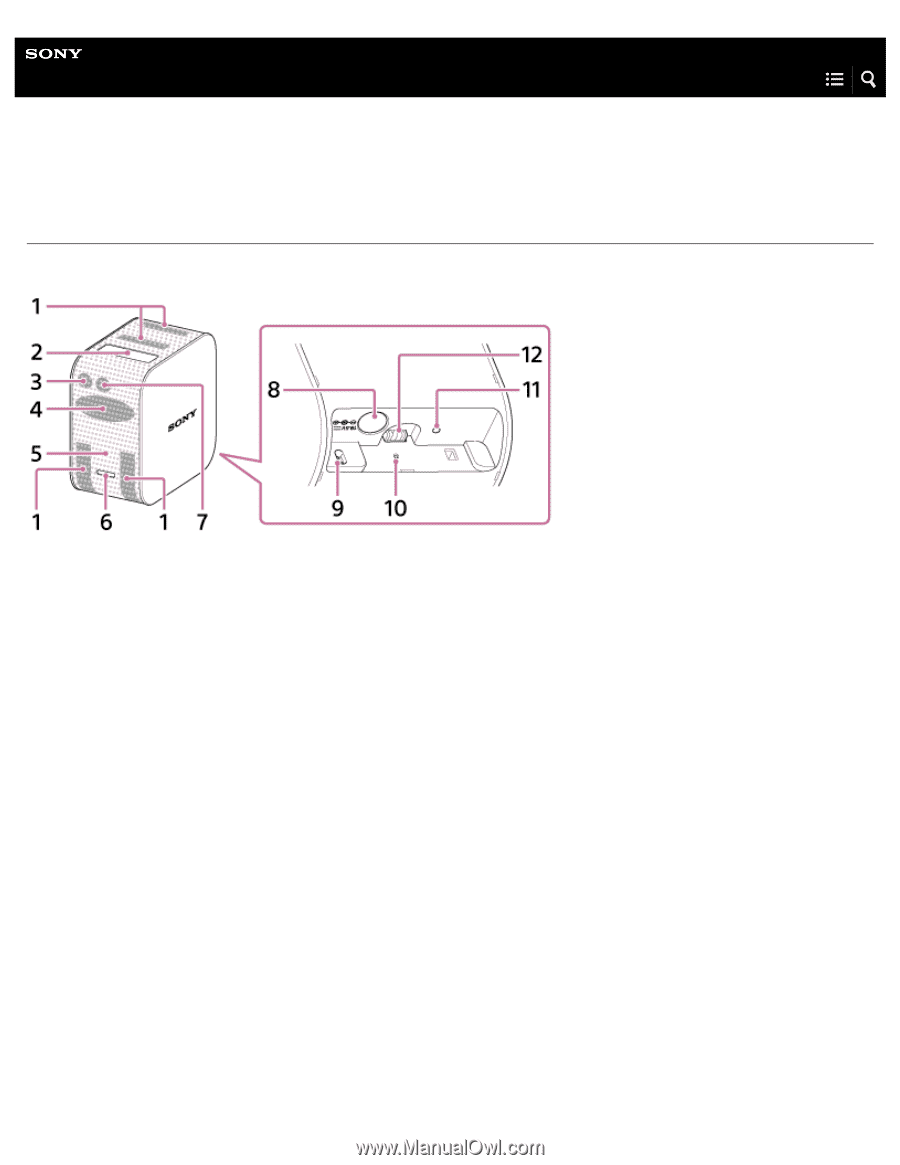
Location of controls (Portable Ultra Short Throw Projector)
 |
View all Sony LSPX-P1 manuals
Add to My Manuals
Save this manual to your list of manuals |
Page 9 highlights
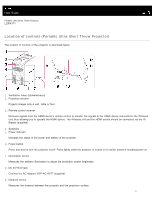
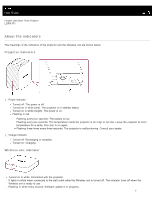
Help Guide Portable Ultra Short Throw Projector LSPX-P1 Location of controls (Portable Ultra Short Throw Projector) The location of controls of the projector is described below. 1. Ventilation holes (intake/exhaust) 2. Projection window Projects images onto a wall, table or floor. 3. Remote control receiver Receives signals from the HDMI device's remote control to transfer the signals to the HDMI device connected to the Wireless unit, thus allowing you to operate the HDMI device. The Wireless unit and the HDMI device should be connected via the IR Blaster (supplied). 4. Speakers 5. Power indicator Indicates the status of the power and battery of the projector. 6. Power button Press and hold to turn the projector on/off. Press lightly while the projector is turned on to switch between standby/power-on. 7. Illumination sensor Measures the ambient illumination to adjust the projection screen brightness. 8. DC IN 19.5V jack Connect the AC adaptor VGP-AC19V77 (supplied). 9. Distance sensor Measures the distance between the projector and the projection surface. 3
-
 1
1 -
2
-
3
-
 4
4 -
 5
5 -
 6
6 -
 7
7 -
 8
8 -
 9
9 -
 10
10 -
 11
11 -
 12
12 -
 13
13 -
 14
14 -
15
-
16
-
17
-
18
-
19
-
20
-
21
-
22
-
23
-
24
-
25
-
26
-
27
-
28
-
29
-
30
-
31
-
32
-
33
-
34
-
35
-
36
-
37
-
38
-
39
-
40
-
41
-
42
-
43
-
44
-
45
-
46
-
47
-
48
-
49
-
50
-
51
-
52
-
53
-
54
-
55
-
56
-
57
-
58
-
59
-
60
-
61
-
62
-
63
-
64
-
65
-
66
-
67
-
68
-
69
-
70
-
71
-
72
-
73
-
74
-
75
-
76
-
77
-
78
-
79
-
80
-
81
-
82
-
83
-
84
-
85
-
86
-
87
 |
 |