Sony SRR4 Product Manual (SRMASTER: SRR4 Operation Manual) - Page 31
Setting the Recording Levels, To set the audio signals to monitor
 |
View all Sony SRR4 manuals
Add to My Manuals
Save this manual to your list of manuals |
Page 31 highlights
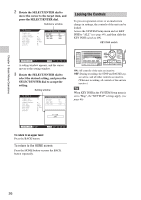
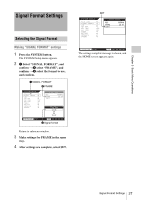
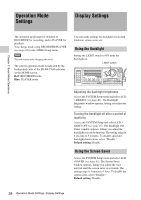
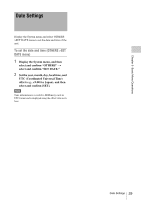
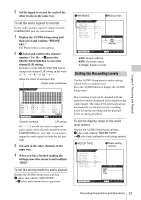
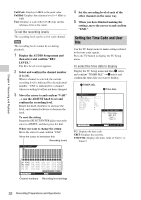
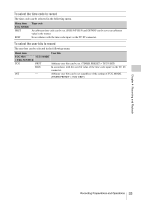
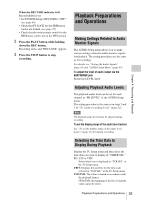
Chapter 4 Recording and Playback 2 Set the signal to record for each of the other tracks in the same way. To set the audio signals to monitor Set the audio monitor signal to output from the EARPHONES jack for each channel. 1 Display the AUDIO Setup menu and then select and confirm "PHONE SEL." The Phone Select screen appears. 2 1 Select and confirm the channel number (1 to 16) t2 press the SELECT/ENTER dial to select the channel L/R setting. Each press of the SELECT/ENTER button changes the channel L/R setting in the order of "-L" t"-R "t"LR "t"- - ." Move the cursor to and select this Output audio indications Phone Select 1 2 3 4 5 6 7 8 9 10 11 12 13 14 15 16 CH1 L CH2 - R CH3 - CH4 - - CH5 L CH6 - R CH7 - CH8 - - CH9 - CH10 - CH11 - CH12 - - CH13 - CH14 - CH15 L CH16 - R END SR-R4:CAM STOP TCG 00:00:00:00 Channel numbers L/R setting Set "- -" if you do not want to output the audio signal of the selected channel from the EARPHONES jack, and "LR" if you want to output the audio signal via both the left and right. 3 Set each of the other channels in the same way. 4 When you have finished making the settings, move the cursor to and confirm "END." To set the mixing mode for audio signals Display the AUDIO Setup menu and then 1 select and confirm "MIX MODE" t2 select and confirm the mixing mode. 1 MIX MODE AUDIO Setup INPUT SEL PHONE SEL MIX MODE REC LEVEL PB LEVEL METER TYPE PEAK HOLD BEEP(PHONE) INPUT DELAY RMS PEAK ON 2 Mixing mode MIX MODE Add RMS Average SR-R4:CAM STOP TCR 00:00:00:00 ADD: Simple addition RMS: Geometric mean Average: Simple average Setting the Recording Levels Use the AUDIO Setup menu to make settings related to the recording levels. Press the AUDIO button to display the AUDIO Setup menu. The recording levels can be checked with the audio level meters displayed in the display on the control panel. The audio level meter indications automatically switch between the recording levels for during recording and the playback levels for during playback. To set the display range of the audio level meters Display the AUDIO Setup menu and then 1 select and confirm "METER TYPE" t2 select and confirm the scale setting method. 1 METER TYPE AUDIO Setup INPUT SEL PHONE SEL MIX MODE REC LEVEL PB LEVEL METER TYPE PEAK HOLD BEEP(PHONE) INPUT DELAY RMS PEAK ON 2 Scale setting method METER TYPE PEAK REF FINE SR-R4:CAM STOP TCR 00:00:00:00 Recording Preparations and Operations 31
-
 1
1 -
2
-
3
-
4
-
5
-
6
-
7
-
8
-
9
-
10
-
11
-
12
-
13
-
14
-
15
-
16
-
17
-
18
-
19
-
20
-
21
-
22
-
23
-
24
-
25
-
 26
26 -
 27
27 -
 28
28 -
 29
29 -
 30
30 -
 31
31 -
 32
32 -
 33
33 -
 34
34 -
 35
35 -
 36
36 -
37
-
38
-
39
-
40
-
41
-
42
-
43
-
44
-
45
-
46
-
47
-
48
-
49
-
50
-
51
-
52
-
53
-
54
-
55
-
56
-
57
-
58
-
59
-
60
-
61
 |
 |
