Sony SRR4 Product Manual (SRMASTER: SRR4 Operation Manual) - Page 32
Setting the Time Code and User Bits, To set the recording levels, To select the time data to display
 |
View all Sony SRR4 manuals
Add to My Manuals
Save this manual to your list of manuals |
Page 32 highlights
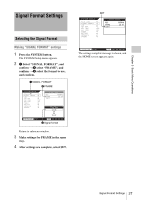
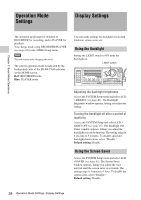
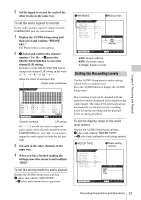
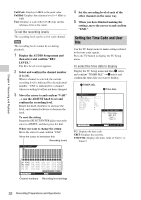
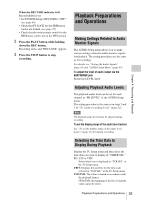
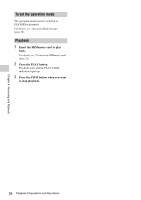
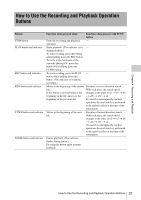
Chapter 4 Recording and Playback Full Peak: Displays 0 dBFS as the peak value. Full Ref: Displays the reference level (+4 dBu) as 0 dB. Fine: Displays a scale with 0.25 dB steps and the reference level at the center. To set the recording levels The recording level can be set for each channel. Note The recording levels cannot be set during playback. 1 Display the AUDIO Setup menu and then select and confirm "REC LEVEL." The Rec Level screen appears. 2 Select and confirm the channel number (1 to 16). When a channel is selected, the current recording level is indicated by a hexadecimal number. "UNI" is indicated for a channel whose recording level has not been changed. 3 Move the cursor to and confirm "VAR" t use the ADJUST knob to set and confirm the recording level. Rotate the knob clockwise to increase the level, and counterclockwise to decrease the level. To reset the setting Rotate the SELECT/ENTER dial to move the cursor to RESET, and then press the dial. When you want to change the setting Move the cursor to and confirm "UNI." Move the cursor to and select this Recording levels Rec Level 4 Set the recording level of each of the other channels in the same way. 5 When you have finished making the settings, move the cursor to and confirm "END." Setting the Time Code and User Bits Use the TC Setup menu to make settings related to the time code signals. Press the TC button to display the TC Setup menu. To select the time data to display Display the TC Setup menu and then 1 select and confirm "TIMER SEL" t2 select and confirm the time data you want to display. 1 TIMER SEL 2 Time data TC Setup TIMER SEL TIMER RESET TIMER PRESET TCR SEL TCG MODE RUN MODE TCG SET OTHERS TC LTC PRST R RUN TIMER Mode Select Time Code User Bit Timer-1 Timer-2 SR-R4:CAM STOP TCR 00:00:00:00 TC: Displays the time code. UBIT: Displays the user bits. TM1/TM2: Displays the timer value of Timer 1 or Timer 2. 1 2 3 4 5 6 7 8 9 10 11 12 13 14 15 16 CH1 4040 CH2 4040 CH3 UNI CH4 UNI CH5 4040 CH6 4040 CH7 4040 CH8 4040 CH9 UNI CH13 4000 CH10 UNI CH14 4000 CH11 UNI CH15 4000 CH12 UNI CH16 4000 UNI/VAR RESET END SR-R4:CAM STOP TCG 00:00:00:00 Channel numbers Recording level settings 32 Recording Preparations and Operations
-
 1
1 -
2
-
3
-
4
-
5
-
6
-
7
-
8
-
9
-
10
-
11
-
12
-
13
-
14
-
15
-
16
-
17
-
18
-
19
-
20
-
21
-
22
-
23
-
24
-
25
-
26
-
 27
27 -
 28
28 -
 29
29 -
 30
30 -
 31
31 -
 32
32 -
 33
33 -
 34
34 -
 35
35 -
 36
36 -
 37
37 -
38
-
39
-
40
-
41
-
42
-
43
-
44
-
45
-
46
-
47
-
48
-
49
-
50
-
51
-
52
-
53
-
54
-
55
-
56
-
57
-
58
-
59
-
60
-
61
 |
 |