TP-Link TL-SG3216 TL-SG3216 V1 User Guide - Page 219
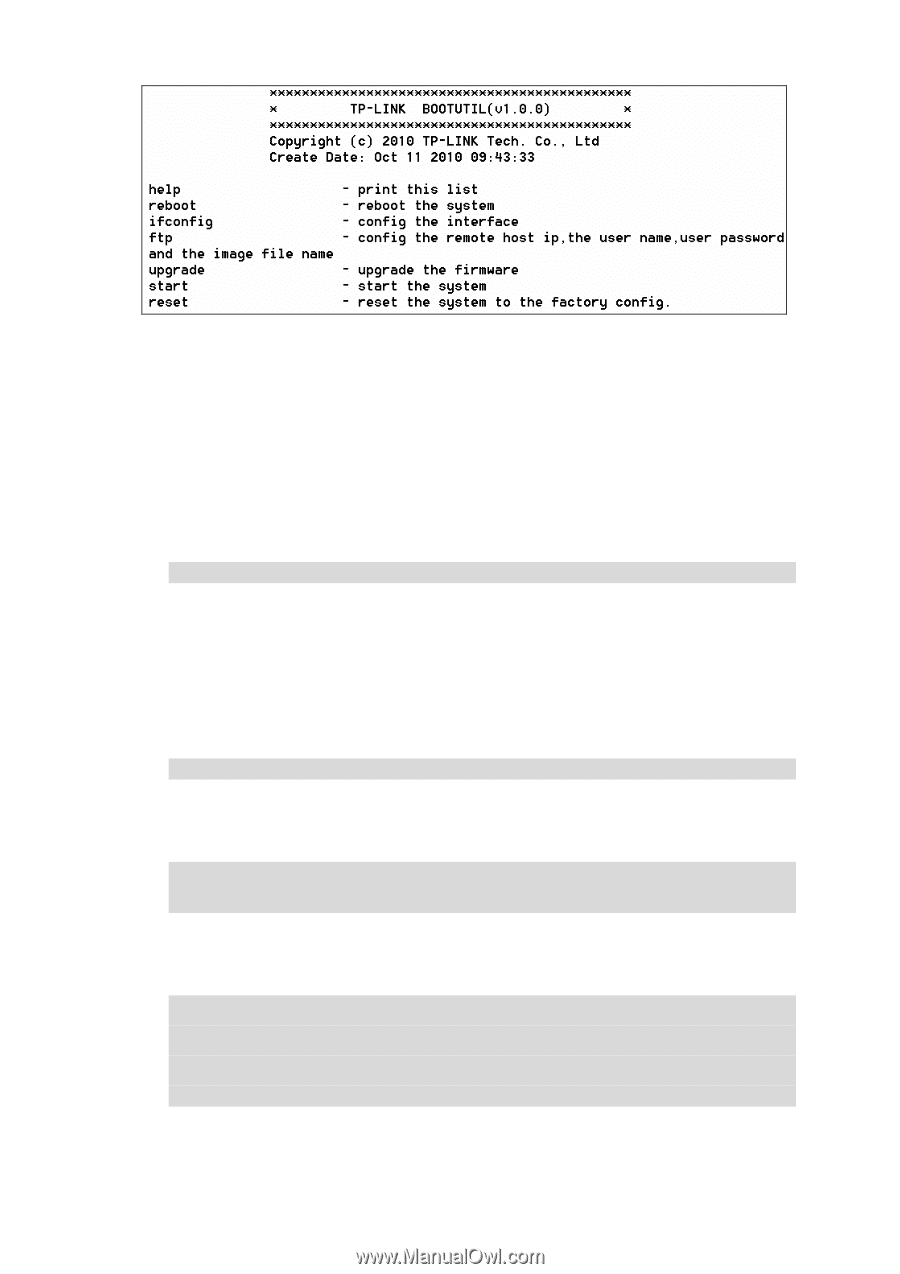
C-6 bootUtil Menu
 |
View all TP-Link TL-SG3216 manuals
Add to My Manuals
Save this manual to your list of manuals |
Page 219 highlights
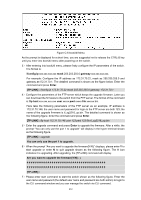
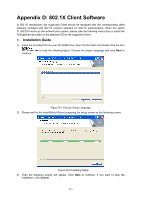
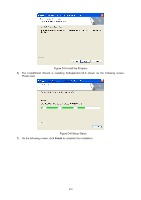
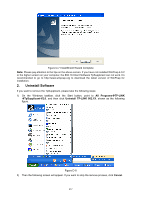
Figure C-6 bootUtil Menu As the prompt is displayed for a short time, you are suggested not to release the CTRL-B key until you enter into bootUtil menu after powering on the switch. 3) After entering into bootUtil menu, please firstly configure the IP parameters of the switch. The format is: ifconfig ip xxx.xxx.xxx.xxx mask 255.255.255.0 gateway xxx.xxx.xxx.xxx. For example: Configure the IP address as 172.31.70.22, mask as 255.255.255.0 and gateway as172.31.70.1. The detailed command is shown as the figure below. Enter the command and press Enter. [TP-LINK] : ifconfig ip 172.31.70.22 mask 255.255.255.0 gateway 172.31.70.1 4) Configure the parameters of the FTP server which keeps the upgrade firmware. Later you can download the firmware to the switch from the FTP server. The format of the command is: ftp host xxx.xxx.xxx.xxx user xxxxx pwd xxxxx file xxxxxx.bin. Here take the following parameters of the FTP server as an example. IP address is 172.31.70.146; the user name and password for login to the FTP server are both 123; the name of the upgrade firmware is tl_sg3216_up.bin. The detailed command is shown as the following figure. Enter the command and press Enter. [TP-LINK] : ftp host 172.31.70.146 user 123 pwd 123 file tl_sg3216_up.bin 5) Enter the upgrade command and press Enter to upgrade the firmware. After a while, the prompt "You can only use the port 1 to upgrade" will display in the hyper terminal shown as the following figure. [TP-LINK] : upgrade You can only use the port 1 to upgrade. 6) When the prompt "Are you want to upgrade the firmware[Y/N]:" displays, please enter Y to start upgrade or enter N to quit upgrade shown as the following figure. The # icon indicates it is upgrading. After upgrading, the [TP-LINK] command will display. Are you want to upgrade the firmware[Y/N] : y [TP-LINK] : 7) Please enter start command to start the switch shown as the following figure. Enter the user name and password (the default user name and password are both admin) to login to the CLI command window and you can manage the switch via CLI command. 212
-
 1
1 -
2
-
3
-
4
-
5
-
6
-
7
-
8
-
9
-
10
-
11
-
12
-
13
-
14
-
15
-
16
-
17
-
18
-
19
-
20
-
21
-
22
-
23
-
24
-
25
-
26
-
27
-
28
-
29
-
30
-
31
-
32
-
33
-
34
-
35
-
36
-
37
-
38
-
39
-
40
-
41
-
42
-
43
-
44
-
45
-
46
-
47
-
48
-
49
-
50
-
51
-
52
-
53
-
54
-
55
-
56
-
57
-
58
-
59
-
60
-
61
-
62
-
63
-
64
-
65
-
66
-
67
-
68
-
69
-
70
-
71
-
72
-
73
-
74
-
75
-
76
-
77
-
78
-
79
-
80
-
81
-
82
-
83
-
84
-
85
-
86
-
87
-
88
-
89
-
90
-
91
-
92
-
93
-
94
-
95
-
96
-
97
-
98
-
99
-
100
-
101
-
102
-
103
-
104
-
105
-
106
-
107
-
108
-
109
-
110
-
111
-
112
-
113
-
114
-
115
-
116
-
117
-
118
-
119
-
120
-
121
-
122
-
123
-
124
-
125
-
126
-
127
-
128
-
129
-
130
-
131
-
132
-
133
-
134
-
135
-
136
-
137
-
138
-
139
-
140
-
141
-
142
-
143
-
144
-
145
-
146
-
147
-
148
-
149
-
150
-
151
-
152
-
153
-
154
-
155
-
156
-
157
-
158
-
159
-
160
-
161
-
162
-
163
-
164
-
165
-
166
-
167
-
168
-
169
-
170
-
171
-
172
-
173
-
174
-
175
-
176
-
177
-
178
-
179
-
180
-
181
-
182
-
183
-
184
-
185
-
186
-
187
-
188
-
189
-
190
-
191
-
192
-
193
-
194
-
195
-
196
-
197
-
198
-
199
-
200
-
201
-
202
-
203
-
204
-
205
-
206
-
207
-
208
-
209
-
210
-
211
-
212
-
213
-
 214
214 -
 215
215 -
 216
216 -
 217
217 -
 218
218 -
 219
219 -
 220
220 -
 221
221 -
 222
222 -
 223
223 -
 224
224 -
225
-
226
-
227
-
228
-
229
-
230
-
231
-
232
 |
 |