Toshiba 40SL500U Owners Manual - Page 59
MPEG NR, Auto Brightness Sensor, Backlight Adjustment Pro
 |
View all Toshiba 40SL500U manuals
Add to My Manuals
Save this manual to your list of manuals |
Page 59 highlights
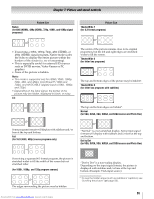
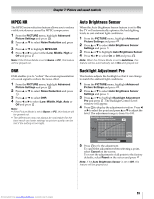
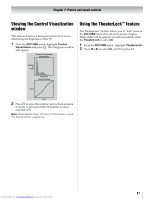
Chapter 7: Picture and sound controls MPEG NR The MPEG noise reduction feature allows you to reduce visible interference caused by MPEG compression. 1 From the PICTURE menu, highlight Advanced Picture Settings and press . OK 2 Press B or b to select Noise Reduction and press . OK 3 Press B or b to highlight MPEG NR. 4 Press C or c to select either Low, Middle, High or Off and press . OK Note: If the Picture Mode is set to Game or PC, this feature will be grayed out. DNR DNR enables you to "soften" the screen representation of a weak signal to reduce the noise effect. 1 From the PICTURE menu, highlight Advanced Picture Settings and press . OK 2 Press B or b to select Noise Reduction and press . OK 3 Press B or b to select DNR. 4 Press C or c to select Low, Middle, High, Auto or Off and press . OK Note: • If the Picture Mode is set to Game or PC, this feature will be grayed out. • The differences may not always be noticeable (for the best result use lower settings as picture quality can be lost if the setting is too high). Auto Brightness Sensor When the Auto Brightness Sensor feature is set to On, the TV will automatically optimize the backlighting levels to suit ambient light conditions. 1 From the PICTURE menu, highlight Advanced Picture Settings and press . OK 2 Press B or b to select Auto Brightness Sensor Settings and press . OK 3 Press B or b to highlight Auto Brightness Sensor. 4 Press C or c to select On or Off and press . OK Note: When the Picture Mode is set to AutoView, this feature will be automatically set to On and grayed out. Backlight Adjustment Pro This feature adjusts the backlight so that it can change to match the ambient light conditions. 1 From the PICTURE menu, highlight Advanced Picture Settings and press . OK 2 Press B or b to select Auto Brightness Sensor Settings and press . OK 3 Press B or b to highlight Backlight Adjustment Pro and press OK . The Backlight Control Level window will appear. 4 Press OK to display the adjustment window. Press C or c to select the point and press B or b to adjust the level. The adjustment range is from 0 to 100. Backlight Adjustment Pro Backlight Control Level 37 100 Control Level 0 Ambient Light Cancel Reset 5 Press OK to fix the adjustment. To cancel the adjustment when selecting a point, select Cancel on the screen. To revert the adjustments of all points to the factory defaults, select Reset on the screen and press . OK Note: If the Auto Brightness Sensor is set to Off, this feature will be grayed out. 59 Downloaded from www.Manualslib.com manuals search engine
-
 1
1 -
2
-
3
-
4
-
5
-
6
-
7
-
8
-
9
-
10
-
11
-
12
-
13
-
14
-
15
-
16
-
17
-
18
-
19
-
20
-
21
-
22
-
23
-
24
-
25
-
26
-
27
-
28
-
29
-
30
-
31
-
32
-
33
-
34
-
35
-
36
-
37
-
38
-
39
-
40
-
41
-
42
-
43
-
44
-
45
-
46
-
47
-
48
-
49
-
50
-
51
-
52
-
53
-
 54
54 -
 55
55 -
 56
56 -
 57
57 -
 58
58 -
 59
59 -
 60
60 -
 61
61 -
 62
62 -
 63
63 -
 64
64 -
65
-
66
-
67
-
68
-
69
-
70
-
71
-
72
-
73
-
74
-
75
-
76
-
77
-
78
-
79
-
80
-
81
-
82
-
83
-
84
-
85
-
86
-
87
-
88
-
89
-
90
-
91
-
92
-
93
-
94
 |
 |