Yamaha ELC-02 ELC-02/ELCU-M02 Owners Manual - Page 192
Manual Setup, Set the SSID, Security and Password
 |
View all Yamaha ELC-02 manuals
Add to My Manuals
Save this manual to your list of manuals |
Page 192 highlights
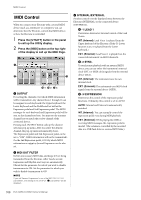
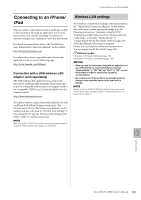
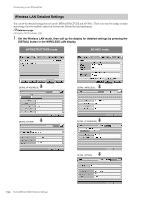
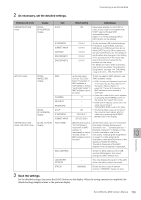
Connecting to an iPhone/iPad Manual Setup If you cannot find the desired network on the display, it may be a network that is closed or hidden. In this case, you will need to manually input SSID, Security and Password settings for connection. NOTE About the confirmation and changes in the access point settings, refer to the manual of the access point. 1 Perform the same operation as in steps 1 - 3 in the "Displaying available networks in the wireless LAN and connecting to a network" instructions on page 191. 2 Press to select [OTHER] at the bottom of the network list. The OTHER NETWORK display will be shown. SECURITY Press the [SECURITY] button in the display to call up the display for security select, then press either the [NONE], [WPA2-PSK (AES)] or [WEP] button. PASSWORD Press the [PASSWORD] button to call up the display for Password input, then set the password in the same way as SSID. Press the [OK] button to finalize the setting. NOTE The password cannot be set when you select [NONE] for the security setting. 4 Press the [CONNECT] button to start connection. The "Connected" indication appears when the instrument and the access point have been successfully connected. 5 After successfully enabling connection between the instrument and the access point, connect the iPhone/iPad to the access point by referring to the "For Electone users iPhone/iPad Connection Manual." 3 Set the SSID, Security and Password to the same as the settings on the access point. Set the same contents with the setting contents by the access point side. SSID Press the [SSID] button in the display to call up the display for SSID input, then enter the SSID. For details on how to enter the characters, refer to the "Changing the Song Name" on page 114. Up to 32 characters (half size), alphanumeric characters, marks can be entered. After entering the SSID, press the [OK] button to finalize the setting. 192 ELC-02/ELCU-M02 Owner's Manual
-
 1
1 -
2
-
3
-
4
-
5
-
6
-
7
-
8
-
9
-
10
-
11
-
12
-
13
-
14
-
15
-
16
-
17
-
18
-
19
-
20
-
21
-
22
-
23
-
24
-
25
-
26
-
27
-
28
-
29
-
30
-
31
-
32
-
33
-
34
-
35
-
36
-
37
-
38
-
39
-
40
-
41
-
42
-
43
-
44
-
45
-
46
-
47
-
48
-
49
-
50
-
51
-
52
-
53
-
54
-
55
-
56
-
57
-
58
-
59
-
60
-
61
-
62
-
63
-
64
-
65
-
66
-
67
-
68
-
69
-
70
-
71
-
72
-
73
-
74
-
75
-
76
-
77
-
78
-
79
-
80
-
81
-
82
-
83
-
84
-
85
-
86
-
87
-
88
-
89
-
90
-
91
-
92
-
93
-
94
-
95
-
96
-
97
-
98
-
99
-
100
-
101
-
102
-
103
-
104
-
105
-
106
-
107
-
108
-
109
-
110
-
111
-
112
-
113
-
114
-
115
-
116
-
117
-
118
-
119
-
120
-
121
-
122
-
123
-
124
-
125
-
126
-
127
-
128
-
129
-
130
-
131
-
132
-
133
-
134
-
135
-
136
-
137
-
138
-
139
-
140
-
141
-
142
-
143
-
144
-
145
-
146
-
147
-
148
-
149
-
150
-
151
-
152
-
153
-
154
-
155
-
156
-
157
-
158
-
159
-
160
-
161
-
162
-
163
-
164
-
165
-
166
-
167
-
168
-
169
-
170
-
171
-
172
-
173
-
174
-
175
-
176
-
177
-
178
-
179
-
180
-
181
-
182
-
183
-
184
-
185
-
186
-
 187
187 -
 188
188 -
 189
189 -
 190
190 -
 191
191 -
 192
192 -
 193
193 -
 194
194 -
 195
195 -
 196
196 -
 197
197 -
198
-
199
-
200
-
201
-
202
-
203
-
204
-
205
-
206
-
207
-
208
-
209
-
210
-
211
-
212
 |
 |
