Yamaha ELC-02 ELC-02/ELCU-M02 Owners Manual - Page 202
Installing the Music Rest, Using the Bench (if included
 |
View all Yamaha ELC-02 manuals
Add to My Manuals
Save this manual to your list of manuals |
Page 202 highlights
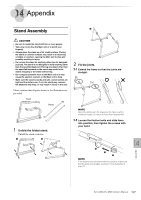
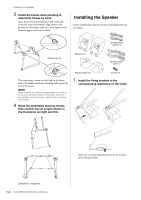
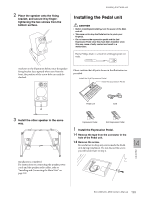
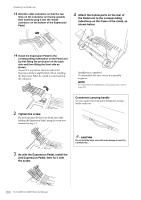
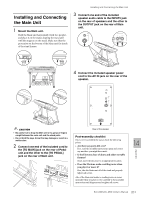
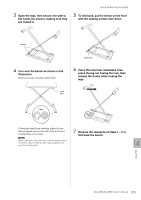
Installing the Music Rest Installing the Music Rest Please confirm that all parts shown in the illustration are provided. Music rest brackets x 2 Music rest 1 Attach the two music rest brackets to the rear panel of the Main unit. Use the inside slots (as shown). Using the Bench (if included) CAUTION • Be careful not to get your finger(s) caught while assembling. • Always place the chair on a flat, stable surface. Placing the chair on uneven surfaces may result in it becoming unstable or overturn, and possibly resulting in injury. • Keep special watch over any small children, since the bench is not stable compared to benches of four legs. 1 Place the bench on the floor with the seating surface face down. Untie the securing band on the legs, and put the ends into the pockets on both sides. Securing band 2 Attach the Music rest to the brackets. 2 Pull up the leg slowly. 202 ELC-02/ELCU-M02 Owner's Manual
-
 1
1 -
2
-
3
-
4
-
5
-
6
-
7
-
8
-
9
-
10
-
11
-
12
-
13
-
14
-
15
-
16
-
17
-
18
-
19
-
20
-
21
-
22
-
23
-
24
-
25
-
26
-
27
-
28
-
29
-
30
-
31
-
32
-
33
-
34
-
35
-
36
-
37
-
38
-
39
-
40
-
41
-
42
-
43
-
44
-
45
-
46
-
47
-
48
-
49
-
50
-
51
-
52
-
53
-
54
-
55
-
56
-
57
-
58
-
59
-
60
-
61
-
62
-
63
-
64
-
65
-
66
-
67
-
68
-
69
-
70
-
71
-
72
-
73
-
74
-
75
-
76
-
77
-
78
-
79
-
80
-
81
-
82
-
83
-
84
-
85
-
86
-
87
-
88
-
89
-
90
-
91
-
92
-
93
-
94
-
95
-
96
-
97
-
98
-
99
-
100
-
101
-
102
-
103
-
104
-
105
-
106
-
107
-
108
-
109
-
110
-
111
-
112
-
113
-
114
-
115
-
116
-
117
-
118
-
119
-
120
-
121
-
122
-
123
-
124
-
125
-
126
-
127
-
128
-
129
-
130
-
131
-
132
-
133
-
134
-
135
-
136
-
137
-
138
-
139
-
140
-
141
-
142
-
143
-
144
-
145
-
146
-
147
-
148
-
149
-
150
-
151
-
152
-
153
-
154
-
155
-
156
-
157
-
158
-
159
-
160
-
161
-
162
-
163
-
164
-
165
-
166
-
167
-
168
-
169
-
170
-
171
-
172
-
173
-
174
-
175
-
176
-
177
-
178
-
179
-
180
-
181
-
182
-
183
-
184
-
185
-
186
-
187
-
188
-
189
-
190
-
191
-
192
-
193
-
194
-
195
-
196
-
 197
197 -
 198
198 -
 199
199 -
 200
200 -
 201
201 -
 202
202 -
 203
203 -
 204
204 -
 205
205 -
 206
206 -
 207
207 -
208
-
209
-
210
-
211
-
212
 |
 |
