Yamaha ELC-02 ELC-02/ELCU-M02 Owners Manual - Page 198
Installing the Speaker, the illustration are tight and firm.
 |
View all Yamaha ELC-02 manuals
Add to My Manuals
Save this manual to your list of manuals |
Page 198 highlights
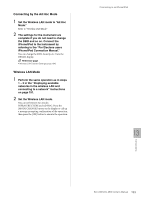
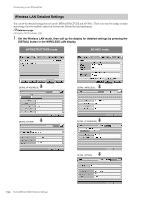
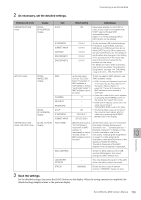
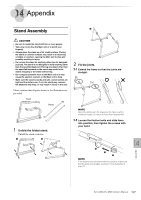
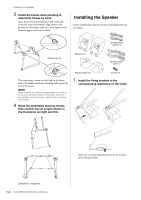
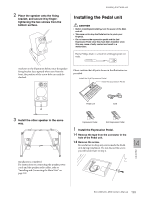
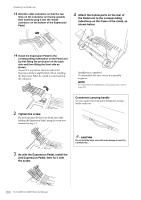
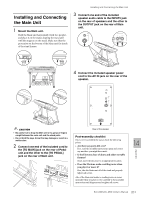
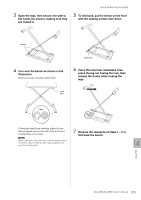
Installing the Speaker 3 Install the braces while pressing to extend the frames by hand. Since the screws are attached to both below and above the frame beforehand, align them to the positions of the frame and brace, then tighten them from the upper side first, by hand. Installing the Speaker Please confirm that all parts shown in the illustration are provided. Speaker audio cables x 2 Positioning hole Speakers x 2 Speaker power cords x 2 The positioning screws are attached on the lower side of the frame, and the positioning holes are at the end of the braces. NOTE When removing the braces at disassembly, the screws of the braces may hard to loosen. In this case, loosen the screws while moving the braces lightly to the front, back, left and right. 4 Raise the assembled stand as shown, then confirm that all screws shown in the illustration are tight and firm. Fixing brackets x 2 Screws x 4 1 Install the fixing brackets to the corresponding indentions on the frame. Assembly is completed. 198 ELC-02/ELCU-M02 Owner's Manual Insert the corresponding indentions to the notches of the fixing brackets.
-
 1
1 -
2
-
3
-
4
-
5
-
6
-
7
-
8
-
9
-
10
-
11
-
12
-
13
-
14
-
15
-
16
-
17
-
18
-
19
-
20
-
21
-
22
-
23
-
24
-
25
-
26
-
27
-
28
-
29
-
30
-
31
-
32
-
33
-
34
-
35
-
36
-
37
-
38
-
39
-
40
-
41
-
42
-
43
-
44
-
45
-
46
-
47
-
48
-
49
-
50
-
51
-
52
-
53
-
54
-
55
-
56
-
57
-
58
-
59
-
60
-
61
-
62
-
63
-
64
-
65
-
66
-
67
-
68
-
69
-
70
-
71
-
72
-
73
-
74
-
75
-
76
-
77
-
78
-
79
-
80
-
81
-
82
-
83
-
84
-
85
-
86
-
87
-
88
-
89
-
90
-
91
-
92
-
93
-
94
-
95
-
96
-
97
-
98
-
99
-
100
-
101
-
102
-
103
-
104
-
105
-
106
-
107
-
108
-
109
-
110
-
111
-
112
-
113
-
114
-
115
-
116
-
117
-
118
-
119
-
120
-
121
-
122
-
123
-
124
-
125
-
126
-
127
-
128
-
129
-
130
-
131
-
132
-
133
-
134
-
135
-
136
-
137
-
138
-
139
-
140
-
141
-
142
-
143
-
144
-
145
-
146
-
147
-
148
-
149
-
150
-
151
-
152
-
153
-
154
-
155
-
156
-
157
-
158
-
159
-
160
-
161
-
162
-
163
-
164
-
165
-
166
-
167
-
168
-
169
-
170
-
171
-
172
-
173
-
174
-
175
-
176
-
177
-
178
-
179
-
180
-
181
-
182
-
183
-
184
-
185
-
186
-
187
-
188
-
189
-
190
-
191
-
192
-
 193
193 -
 194
194 -
 195
195 -
 196
196 -
 197
197 -
 198
198 -
 199
199 -
 200
200 -
 201
201 -
 202
202 -
 203
203 -
204
-
205
-
206
-
207
-
208
-
209
-
210
-
211
-
212
 |
 |
