ZyXEL ARMOR Z1 User Guide - Page 147
Log Screen
 |
View all ZyXEL ARMOR Z1 manuals
Add to My Manuals
Save this manual to your list of manuals |
Page 147 highlights
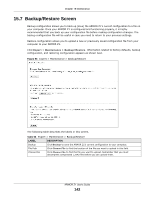
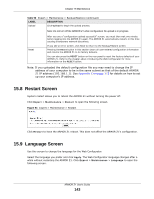
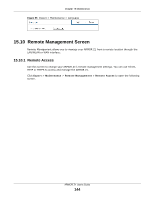
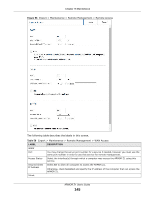
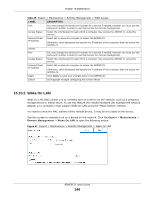
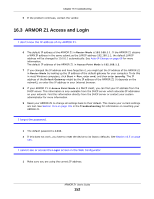
Chapter 15 Maintenance The following table describes the labels in this screen. Table 60 Expert > Maintenance > Remote Management > Wake On LAN LABEL DESCRIPTION Wake On LAN over WAN Settings Enable Wake On LAN over WAN Select Enable to have the ARMOR Z1 forward a WoL "Magic Packet" to all devices on the LAN if the packet comes from the WAN or remote network and uses the port number specified in the Port field. A LAN device whose hardware supports Wake on LAN then will be powered on if it is turned off previously. Port Type a port number from which a WoL packet is forwarded to the LAN. Wake On LAN Wake MAC Address Enter the MAC Address of the device on the network that will be turned on. A MAC address consists of six hexadecimal character pairs. Start Click this to have the ARMOR Z1 generate a WoL packet and forward it to turn the specified device on. Apply Cancel A screen pops up displaying MAC address error if you input the MAC address incorrectly. Click Apply to save your changes back to the ARMOR Z1. Click Cancel to begin configuring this screen afresh. 15.11 Log Screen The Web Configurator allows you to look at all of the ARMOR Z1's logs in one location. You can configure which logs to display in the Log screen. Select the logs you wish to display. Click Apply to save your settings. Click Cancel to start the screen afresh. Use this screen to see the logged messages for the ARMOR Z1. The log wraps around and deletes the old entries after it fills. Select what logs you want to see from the Display drop list. The log choices depend on your settings above this screen. Click Refresh to renew the log screen. Click Clear Log to delete all the logs. ARMOR Z1 User's Guide 147
-
 1
1 -
2
-
3
-
4
-
5
-
6
-
7
-
8
-
9
-
10
-
11
-
12
-
13
-
14
-
15
-
16
-
17
-
18
-
19
-
20
-
21
-
22
-
23
-
24
-
25
-
26
-
27
-
28
-
29
-
30
-
31
-
32
-
33
-
34
-
35
-
36
-
37
-
38
-
39
-
40
-
41
-
42
-
43
-
44
-
45
-
46
-
47
-
48
-
49
-
50
-
51
-
52
-
53
-
54
-
55
-
56
-
57
-
58
-
59
-
60
-
61
-
62
-
63
-
64
-
65
-
66
-
67
-
68
-
69
-
70
-
71
-
72
-
73
-
74
-
75
-
76
-
77
-
78
-
79
-
80
-
81
-
82
-
83
-
84
-
85
-
86
-
87
-
88
-
89
-
90
-
91
-
92
-
93
-
94
-
95
-
96
-
97
-
98
-
99
-
100
-
101
-
102
-
103
-
104
-
105
-
106
-
107
-
108
-
109
-
110
-
111
-
112
-
113
-
114
-
115
-
116
-
117
-
118
-
119
-
120
-
121
-
122
-
123
-
124
-
125
-
126
-
127
-
128
-
129
-
130
-
131
-
132
-
133
-
134
-
135
-
136
-
137
-
138
-
139
-
140
-
141
-
 142
142 -
 143
143 -
 144
144 -
 145
145 -
 146
146 -
 147
147 -
 148
148 -
 149
149 -
 150
150 -
 151
151 -
 152
152 -
153
-
154
-
155
-
156
-
157
-
158
-
159
-
160
-
161
-
162
-
163
-
164
-
165
-
166
-
167
-
168
-
169
-
170
-
171
-
172
-
173
-
174
-
175
-
176
-
177
-
178
-
179
-
180
-
181
-
182
-
183
-
184
-
185
-
186
-
187
-
188
-
189
-
190
-
191
-
192
-
193
-
194
-
195
-
196
-
197
-
198
-
199
-
200
-
201
-
202
-
203
-
204
-
205
-
206
-
207
-
208
-
209
-
210
-
211
-
212
-
213
-
214
-
215
 |
 |
