ZyXEL ARMOR Z1 User Guide - Page 46
Navigation Panel, 7.5 LAN Screen
 |
View all ZyXEL ARMOR Z1 manuals
Add to My Manuals
Save this manual to your list of manuals |
Page 46 highlights
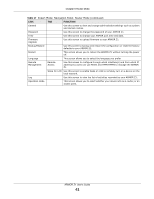
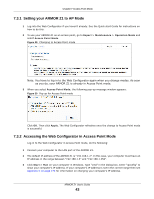
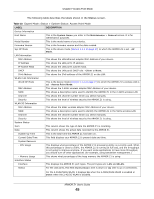
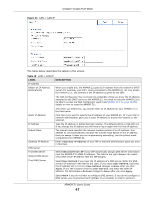
Chapter 7 Access Point Mode Table 18 Expert Mode: Status > System Status: Access Point Mode (continued) LABEL Rate DESCRIPTION For the LAN ports, this displays the port speed and duplex setting or is left blank when the line is disconnected. Printer Information Printer Name For the 2.4GHz/5GHz WLAN, it displays the maximum transmission rate when the 2.4GHz/ 5GHz WLAN is enabled and N/A when the WLAN is disabled. The ARMOR Z1 can act as a print server and allows you to share a USB printer on your LAN. This displays the name of the printer connected to the ARMOR Z1's USB port. Note: You need to manually install the printer driver in your computer and add the printer to your printer list. 7.4.1 Navigation Panel Use the menu in the navigation panel to configure ARMOR Z1 features in Access Point Mode. Figure 32 Expert Mode: Navigation Panel: Access Point Mode Refer to Table 17 on page 39 for descriptions of the labels shown in the navigation panel. 7.5 LAN Screen Use this section to configure your LAN settings while in Access Point Mode. Click Expert > LAN to see the screen below. Note: If you change the IP address of the ARMOR Z1 in the screen below, you will need to log into the ARMOR Z1 again using the new IP address. ARMOR Z1 User's Guide 46
-
 1
1 -
2
-
3
-
4
-
5
-
6
-
7
-
8
-
9
-
10
-
11
-
12
-
13
-
14
-
15
-
16
-
17
-
18
-
19
-
20
-
21
-
22
-
23
-
24
-
25
-
26
-
27
-
28
-
29
-
30
-
31
-
32
-
33
-
34
-
35
-
36
-
37
-
38
-
39
-
40
-
 41
41 -
 42
42 -
 43
43 -
 44
44 -
 45
45 -
 46
46 -
 47
47 -
 48
48 -
 49
49 -
 50
50 -
 51
51 -
52
-
53
-
54
-
55
-
56
-
57
-
58
-
59
-
60
-
61
-
62
-
63
-
64
-
65
-
66
-
67
-
68
-
69
-
70
-
71
-
72
-
73
-
74
-
75
-
76
-
77
-
78
-
79
-
80
-
81
-
82
-
83
-
84
-
85
-
86
-
87
-
88
-
89
-
90
-
91
-
92
-
93
-
94
-
95
-
96
-
97
-
98
-
99
-
100
-
101
-
102
-
103
-
104
-
105
-
106
-
107
-
108
-
109
-
110
-
111
-
112
-
113
-
114
-
115
-
116
-
117
-
118
-
119
-
120
-
121
-
122
-
123
-
124
-
125
-
126
-
127
-
128
-
129
-
130
-
131
-
132
-
133
-
134
-
135
-
136
-
137
-
138
-
139
-
140
-
141
-
142
-
143
-
144
-
145
-
146
-
147
-
148
-
149
-
150
-
151
-
152
-
153
-
154
-
155
-
156
-
157
-
158
-
159
-
160
-
161
-
162
-
163
-
164
-
165
-
166
-
167
-
168
-
169
-
170
-
171
-
172
-
173
-
174
-
175
-
176
-
177
-
178
-
179
-
180
-
181
-
182
-
183
-
184
-
185
-
186
-
187
-
188
-
189
-
190
-
191
-
192
-
193
-
194
-
195
-
196
-
197
-
198
-
199
-
200
-
201
-
202
-
203
-
204
-
205
-
206
-
207
-
208
-
209
-
210
-
211
-
212
-
213
-
214
-
215
 |
 |