ZyXEL ARMOR Z1 User Guide - Page 78
NAT, 10.5.1 General Screen, NAT
 |
View all ZyXEL ARMOR Z1 manuals
Add to My Manuals
Save this manual to your list of manuals |
Page 78 highlights
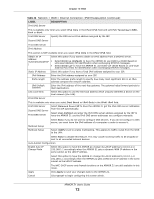
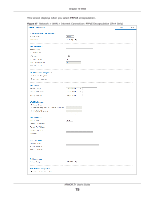
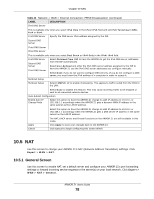
Chapter 10 WAN Table 23 Network > WAN > Internet Connection: PPPoE Encapsulation (continued) LABEL IPv6 DNS Server DESCRIPTION This is available only when you select IPv4 Only in the IPv4/IPv6 field and set IPv6 Tunneling to 6RD, 6in4 or 6to4. First DNS Server Specify the DNS server IPv6 address assigned by the ISP. Second DNS Server Third DNS Server IPv6 DNS Server This is available only when you select Dual Stack or IPv6 Only in the IPv4/IPv6 field. First DNS Server Second DNS Server Third DNS Server Select Obtained From ISP to have the ARMOR Z1 get the IPv6 DNS server addresses from the ISP automatically. Select User-Defined and enter the IPv6 DNS server address assigned by the ISP to have the ARMOR Z1 use the IPv6 DNS server addresses you configure manually. Select None if you do not want to configure DNS servers. If you do not configure a DNS server, you must know the IPv6 address of a computer in order to access it. Multicast Setup Multicast Setup Select IGMPv1/v2 to enable multicasting. This applies to traffic routed from the WAN to the LAN. Select None to disable this feature. This may cause incoming traffic to be dropped or sent to all connected network devices. Auto-Subnet Configuration Enable Auto-IPChange Mode Select this option to have the ARMOR Z1 change its LAN IP address to 10.0.0.1 or 192.168.1.1 accordingly when the ARMOR Z1 gets a dynamic WAN IP address in the same subnet as the LAN IP address. Select this option to have the ARMOR Z1 change its LAN IP address to 10.0.0.1 or 192.168.1.1 accordingly when the ARMOR Z1 gets a DNS server IP address in the same subnet as the LAN IP address. Apply Cancel The NAT, DHCP server and firewall functions on the ARMOR Z1 are still available in this mode. Click Apply to save your changes back to the ARMOR Z1. Click Cancel to begin configuring this screen afresh. 10.5 NAT Use this screen to change your ARMOR Z1's NAT (Network Address Translation) settings. Click Expert > WAN > NAT. 10.5.1 General Screen Use this screen to enable NAT, set a default server and configure your ARMOR Z1's port forwarding settings to forward incoming service requests to the server(s) on your local network. Click Expert > WAN > NAT > General. ARMOR Z1 User's Guide 78
-
 1
1 -
2
-
3
-
4
-
5
-
6
-
7
-
8
-
9
-
10
-
11
-
12
-
13
-
14
-
15
-
16
-
17
-
18
-
19
-
20
-
21
-
22
-
23
-
24
-
25
-
26
-
27
-
28
-
29
-
30
-
31
-
32
-
33
-
34
-
35
-
36
-
37
-
38
-
39
-
40
-
41
-
42
-
43
-
44
-
45
-
46
-
47
-
48
-
49
-
50
-
51
-
52
-
53
-
54
-
55
-
56
-
57
-
58
-
59
-
60
-
61
-
62
-
63
-
64
-
65
-
66
-
67
-
68
-
69
-
70
-
71
-
72
-
 73
73 -
 74
74 -
 75
75 -
 76
76 -
 77
77 -
 78
78 -
 79
79 -
 80
80 -
 81
81 -
 82
82 -
 83
83 -
84
-
85
-
86
-
87
-
88
-
89
-
90
-
91
-
92
-
93
-
94
-
95
-
96
-
97
-
98
-
99
-
100
-
101
-
102
-
103
-
104
-
105
-
106
-
107
-
108
-
109
-
110
-
111
-
112
-
113
-
114
-
115
-
116
-
117
-
118
-
119
-
120
-
121
-
122
-
123
-
124
-
125
-
126
-
127
-
128
-
129
-
130
-
131
-
132
-
133
-
134
-
135
-
136
-
137
-
138
-
139
-
140
-
141
-
142
-
143
-
144
-
145
-
146
-
147
-
148
-
149
-
150
-
151
-
152
-
153
-
154
-
155
-
156
-
157
-
158
-
159
-
160
-
161
-
162
-
163
-
164
-
165
-
166
-
167
-
168
-
169
-
170
-
171
-
172
-
173
-
174
-
175
-
176
-
177
-
178
-
179
-
180
-
181
-
182
-
183
-
184
-
185
-
186
-
187
-
188
-
189
-
190
-
191
-
192
-
193
-
194
-
195
-
196
-
197
-
198
-
199
-
200
-
201
-
202
-
203
-
204
-
205
-
206
-
207
-
208
-
209
-
210
-
211
-
212
-
213
-
214
-
215
 |
 |
