ZyXEL P-100 User Guide - Page 32
Connect Your Computer and Your Prestige, Connect the WAN Device, Ethernet Connections, Connect
 |
View all ZyXEL P-100 manuals
Add to My Manuals
Save this manual to your list of manuals |
Page 32 highlights
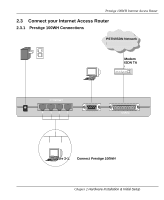
Prestige 100WH Internet Access Router This section outlines how to connect your Prestige to the LAN and the telephone line. Refer to Figure 1-2 to identify all of the ports. Then see Figure 2-1 when you attempt to make the various connections. Follow these steps for a quick and correct installation of your Prestige. Step 1. Connect Your Computer and Your Prestige For the initial setup and configuration of your Prestige, you must use a terminal emulator on a workstation and connect the workstation's serial (COM) port to the console port with a RS-232 cable. After your Prestige has been successfully installed, you can modify the configuration through a remote telnet connection. See Chapter 9 - Telnet Configuration and Capabilities for detailed instructions on using telnet to configure your Prestige. Step 2. Connect the WAN Device Connect the DTE port of the WAN device to the WAN port of the Prestige with a RS-232 cable. Please follow the instructions of your WAN device to connect it to the telephone or ISDN network and to the power outlet. Power on the WAN device. Step 3. Ethernet Connections Use Ethernet ports 1, 2, 3 and 4 at the rear panel to create an Ethernet 10Base-T network. Connect a workstation to the Prestige using a straight-through 10Base-T cable, which is a Unshielded Twisted Pair (UTP) cable with RJ-45 connectors that look like a bigger telephone plug with 8 pins. Step 4. Connect the Power Adapter to your Prestige Plug the power adapter into the port labeled POWER on the rear panel of your Prestige. 2-4 Chapter 2 Hardware Installation & Initial Setup
-
 1
1 -
2
-
3
-
4
-
5
-
6
-
7
-
8
-
9
-
10
-
11
-
12
-
13
-
14
-
15
-
16
-
17
-
18
-
19
-
20
-
21
-
22
-
23
-
24
-
25
-
26
-
 27
27 -
 28
28 -
 29
29 -
 30
30 -
 31
31 -
 32
32 -
 33
33 -
 34
34 -
 35
35 -
 36
36 -
 37
37 -
38
-
39
-
40
-
41
-
42
-
43
-
44
-
45
-
46
-
47
-
48
-
49
-
50
-
51
-
52
-
53
-
54
-
55
-
56
-
57
-
58
-
59
-
60
-
61
-
62
-
63
-
64
-
65
-
66
-
67
-
68
-
69
-
70
-
71
-
72
-
73
-
74
-
75
-
76
-
77
-
78
-
79
-
80
-
81
-
82
-
83
-
84
-
85
-
86
-
87
-
88
-
89
-
90
-
91
-
92
-
93
-
94
-
95
-
96
-
97
-
98
-
99
-
100
-
101
-
102
-
103
-
104
-
105
-
106
-
107
-
108
-
109
-
110
-
111
-
112
-
113
-
114
-
115
-
116
-
117
-
118
-
119
-
120
-
121
-
122
-
123
-
124
-
125
-
126
 |
 |
