ZyXEL P-100 User Guide - Page 49
Configuring TCP/IP and DHCP
 |
View all ZyXEL P-100 manuals
Add to My Manuals
Save this manual to your list of manuals |
Page 49 highlights
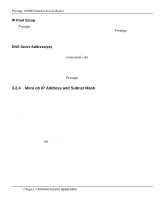
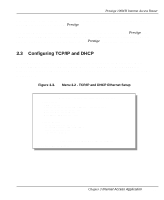
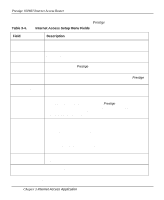
Prestige 100WH Internet Access Router Once you have decided on the network number, pick an IP address that is easy to remember, for example, 192.168.1.1, for your Prestige. The subnet mask specifies the network number portion of an IP address. Your Prestige will compute the subnet mask automatically based on the IP address that you entered. You do not need to change the subnet mask computed by the Prestige unless instructed otherwise. 3.3 Configuring TCP/IP and DHCP To edit Menu 3.2, select the menu option [3. Ethernet Setup] in the Main Menu. When Menu 3 appears, select the submenu option [2. TCP/IP and DHCP Setup] and press [Enter]. The screen now displays Menu 3.2 - TCP/IP and DHCP Ethernet Setup, as shown in Figure 3-3. Figure 3-3. Menu 3.2 - TCP/IP and DHCP Ethernet Setup Menu 3.2 - TCP/IP and DHCP Ethernet Setup DHCP Setup: DHCP= Server Client IP Pool Starting Address= 192.168.1.33 Size of Client IP Pool= 32 Primary DNS Server= N/A Secondary DNS Server= N/A TCP/IP Setup: IP Address= 192.68.1.1 IP Subnet Mask= 255.255.255.0 RIP Direction= Both Version= RIP-1 Enter here to CONFIRM or ESC to CANCEL: Press Space Bar to Toggle. Chapter 3 Internet Access Application 3-5
-
 1
1 -
2
-
3
-
4
-
5
-
6
-
7
-
8
-
9
-
10
-
11
-
12
-
13
-
14
-
15
-
16
-
17
-
18
-
19
-
20
-
21
-
22
-
23
-
24
-
25
-
26
-
27
-
28
-
29
-
30
-
31
-
32
-
33
-
34
-
35
-
36
-
37
-
38
-
39
-
40
-
41
-
42
-
43
-
 44
44 -
 45
45 -
 46
46 -
 47
47 -
 48
48 -
 49
49 -
 50
50 -
 51
51 -
 52
52 -
 53
53 -
 54
54 -
55
-
56
-
57
-
58
-
59
-
60
-
61
-
62
-
63
-
64
-
65
-
66
-
67
-
68
-
69
-
70
-
71
-
72
-
73
-
74
-
75
-
76
-
77
-
78
-
79
-
80
-
81
-
82
-
83
-
84
-
85
-
86
-
87
-
88
-
89
-
90
-
91
-
92
-
93
-
94
-
95
-
96
-
97
-
98
-
99
-
100
-
101
-
102
-
103
-
104
-
105
-
106
-
107
-
108
-
109
-
110
-
111
-
112
-
113
-
114
-
115
-
116
-
117
-
118
-
119
-
120
-
121
-
122
-
123
-
124
-
125
-
126
 |
 |