ZyXEL P-100 User Guide - Page 33
Connecting External Hubs, Power On Your
 |
View all ZyXEL P-100 manuals
Add to My Manuals
Save this manual to your list of manuals |
Page 33 highlights
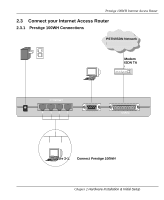
Prestige 100WH Internet Access Router 2.4 Connecting External Hubs The Prestige can accommodate up to 4 workstations on the built-in Ethernet hub; if you have more than 4, then you need an external hub for the additional ones. If this is the case, connect the external hub to the Prestige using a straight-through cable from the uplink port of the external hub to one of the 4 Ethernet ports of the Prestige. Please make sure that the uplink port on the external hub is in the uplink mode (usually with a toggle switch). If your external hub does not have an uplink port, then you must use a crossover cable to daisy-chain it to the Prestige. 2.5 Power On Your Prestige At this point, you should have connected the computer, the telephone line, the Ethernet cable, and the power supply to your Prestige. You can now power on your Prestige by plugging the AC adapter to the appropriate power outlet. Step 1. Initial Screen When you power on your Prestige, the Internet Access Router performs several internal tests and performs a modem initialization. After initialization, the Prestige asks you to press [Enter] to continue, as shown in Figure 2-2. Figure 2-2. Power-On Display Copyright (c) 1994 - 1998 ZyXEL Communications Corp. ethernet address: 00:a0:c5:00:10:32 Wan port init ... done Modem init . inactive Press ENTER to continue... Chapter 2 Hardware Installation & Initial Setup 2-5
-
 1
1 -
2
-
3
-
4
-
5
-
6
-
7
-
8
-
9
-
10
-
11
-
12
-
13
-
14
-
15
-
16
-
17
-
18
-
19
-
20
-
21
-
22
-
23
-
24
-
25
-
26
-
27
-
 28
28 -
 29
29 -
 30
30 -
 31
31 -
 32
32 -
 33
33 -
 34
34 -
 35
35 -
 36
36 -
 37
37 -
 38
38 -
39
-
40
-
41
-
42
-
43
-
44
-
45
-
46
-
47
-
48
-
49
-
50
-
51
-
52
-
53
-
54
-
55
-
56
-
57
-
58
-
59
-
60
-
61
-
62
-
63
-
64
-
65
-
66
-
67
-
68
-
69
-
70
-
71
-
72
-
73
-
74
-
75
-
76
-
77
-
78
-
79
-
80
-
81
-
82
-
83
-
84
-
85
-
86
-
87
-
88
-
89
-
90
-
91
-
92
-
93
-
94
-
95
-
96
-
97
-
98
-
99
-
100
-
101
-
102
-
103
-
104
-
105
-
106
-
107
-
108
-
109
-
110
-
111
-
112
-
113
-
114
-
115
-
116
-
117
-
118
-
119
-
120
-
121
-
122
-
123
-
124
-
125
-
126
 |
 |