ZyXEL P-100 User Guide - Page 62
Remote Node Profile Menu Fields for Dial-up Line Applications
 |
View all ZyXEL P-100 manuals
Add to My Manuals
Save this manual to your list of manuals |
Page 62 highlights
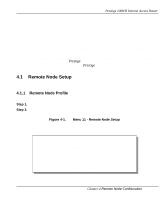
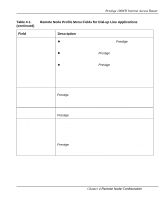
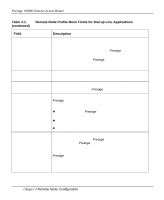
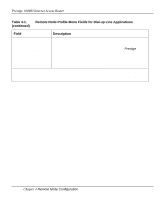
Prestige 100WH Internet Access Router Step 3. When Submenu 11.1. - Remote Node Profile appears, as shown in Figure 4-2, follow the instructions in Table 4-1 to configure a remote node. Menu 11.1 - Remote Node Profile Rem Node Name= ? Active= Yes Call Direction= Both Incoming: Rem Login= ? Rem Password= ? Rem CLID= Call Back= No Outgoing: My Login= ? My Password= ? Authen= CHAP/PAP Pri Phone #= ? Sec Phone #= Edit PPP Options= No Rem IP Addr= ? Edit IP = No Edit Script Options= No Telco Option: Allocated Budget(min)= 0 Period(hr)= 0 Session Options: Input Filter Sets= Output Filter Sets= Call Filter Sets= Idle Timeout(sec)= 300 Press ENTER to CONFIRM or ESC to CANCEL: Press Space Bar to Toggle. Figure 4-2. Menu 11.1 - Remote Node Profile for Dial-up Line Applications Table 4-1 contains the instructions on how to configure the remote node menu. Table 4-1. Remote Node Profile Menu Fields for Dial-up Line Applications Field Description Rem Node Name This is a required field. Enter a descriptive name for the remote node, for example, Corp. This field can support up to eight characters. This name must be unique from any other remote node name or dial-in user name. Active Press the space bar to toggle between [Yes] and [No]. Inactive nodes are displayed with a minus sign (-) at the beginning of the name in Menu 11. 4-2 Chapter 4 Remote Node Configuration
-
 1
1 -
2
-
3
-
4
-
5
-
6
-
7
-
8
-
9
-
10
-
11
-
12
-
13
-
14
-
15
-
16
-
17
-
18
-
19
-
20
-
21
-
22
-
23
-
24
-
25
-
26
-
27
-
28
-
29
-
30
-
31
-
32
-
33
-
34
-
35
-
36
-
37
-
38
-
39
-
40
-
41
-
42
-
43
-
44
-
45
-
46
-
47
-
48
-
49
-
50
-
51
-
52
-
53
-
54
-
55
-
56
-
 57
57 -
 58
58 -
 59
59 -
 60
60 -
 61
61 -
 62
62 -
 63
63 -
 64
64 -
 65
65 -
 66
66 -
 67
67 -
68
-
69
-
70
-
71
-
72
-
73
-
74
-
75
-
76
-
77
-
78
-
79
-
80
-
81
-
82
-
83
-
84
-
85
-
86
-
87
-
88
-
89
-
90
-
91
-
92
-
93
-
94
-
95
-
96
-
97
-
98
-
99
-
100
-
101
-
102
-
103
-
104
-
105
-
106
-
107
-
108
-
109
-
110
-
111
-
112
-
113
-
114
-
115
-
116
-
117
-
118
-
119
-
120
-
121
-
122
-
123
-
124
-
125
-
126
 |
 |