Alpine INE-S920HD Owner's Manual (english) - Page 61
Camera Setup, Camera Setup Operation, Direct Camera Setting, Setting the Camera Input - owner s manual
 |
View all Alpine INE-S920HD manuals
Add to My Manuals
Save this manual to your list of manuals |
Page 61 highlights
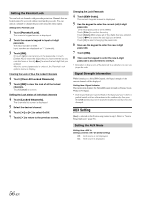
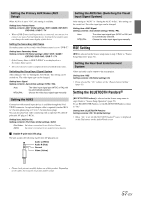
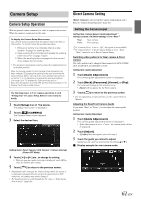
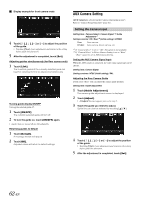
Camera Setup Camera Setup Operation With an optional camera connected, its video is output to the monitor. When the camera is connected, set this item. To display the Camera Setup Menu screen: Your vehicle must be parked with the ignition key in the ACC or ON position. To do this, follow the procedures below. 1 Bring your vehicle to a complete stop at a safe location. Engage the parking brake. 2 Keep pushing the foot brake and release the parking brake once then engage it again. 3 When the parking brake is engaged for the second time, release the foot brake. • For automatic transmission vehicles, place the transmission lever in the Park position. Now, the locking system for the Camera mode operation has been released. Engaging the parking brake can reactivate the Camera Setup Menu, as long as the car's ignition has not been turned off. It is not necessary to repeat the above procedure (1 through 3) of "To display the Camera mode screen." Each time the ignition is turned OFF, perform the procedure of "To display the Camera mode screen." The following steps 1 to 5 are common operations to each "Setting item" of Camera Setup. Refer to each section for details. 1 Touch [Setup] icon of Top banner. The Setup main screen is displayed. 2 Touch [ (CAMERA)]. The Camera Setup screen appears. 3 Select the desired item. Setting items: Direct Camera / AUX Camera* / Camera Interrupt (Power OFF Mode) 4 Touch [ ] or [ ] etc., to change its setting. • When the pop-up window for setup is displayed, touch [ ] to close the window after setting. 5 Touch [ ] to return to the previous screen. • Immediately after changing the Camera Setup (while the system is writing data automatically) do not turn the ignition key to OFF. Otherwise, the settings may not be changed. • For details on how to scroll through the list, refer to "Selecting an Item in a List" (page 29). Direct Camera Setting [Direct Camera] is selected on the Camera setup menu in step 3. Refer to "Camera Setup Operation" (page 61). Setting the Camera Input Setting item: Camera Select / Guide Adjustment*1 Setting contents: Off (Initial setting) / Front / Rear*2 Rear: Front: Rear camera Front camera *1 If "Camera Select" is set to "Off", this option is not available. *2 If "Camera Select" in AUX Camera Setting is set to "Rear," "Rear" cannot be set in Direct Camera Setting. Switching video patterns for Rear camera & Front camera The video pattern can be changed when connected to HCE-C200R/ HCE-C200F/HCE-C210RD/HCE-C212F. Setting item: Guide Adjustment 1 Touch [Guide Adjustment]. The camera guide adjustment screen is displayed. 2 Touch [Back], [Panorama], [Corner], or [Top]. The view will change to the selected view. • [Back] will not appear for the Front camera. 3 Touch [ ] to return to the previous screen. • For an explanation of video patterns, see the camera Owner's Manual. Adjusting the Rear/Front Camera Guide If you select "Rear" or "Front," you can adjust the camera guide position. Setting item: Guide Adjustment 1 Touch [Guide Adjustment]. The camera guide adjustment screen is displayed. • If the video pattern is set to "Corner," the camera guide will not be displayed. 2 Touch [Adjust]. • If [Adjust] does not appear, proceed to step 3. 3 Touch the guide you intend to adjust. Guide line can also be selected by touching [ ] [ ]. Display example for rear camera mode 61-EN
-
 1
1 -
2
-
3
-
4
-
5
-
6
-
7
-
8
-
9
-
10
-
11
-
12
-
13
-
14
-
15
-
16
-
17
-
18
-
19
-
20
-
21
-
22
-
23
-
24
-
25
-
26
-
27
-
28
-
29
-
30
-
31
-
32
-
33
-
34
-
35
-
36
-
37
-
38
-
39
-
40
-
41
-
42
-
43
-
44
-
45
-
46
-
47
-
48
-
49
-
50
-
51
-
52
-
53
-
54
-
55
-
 56
56 -
 57
57 -
 58
58 -
 59
59 -
 60
60 -
 61
61 -
 62
62 -
 63
63 -
 64
64 -
 65
65 -
 66
66 -
67
-
68
-
69
-
70
-
71
-
72
-
73
-
74
-
75
-
76
-
77
-
78
-
79
-
80
-
81
-
82
-
83
-
84
-
85
-
86
-
87
-
88
-
89
-
90
-
91
-
92
-
93
-
94
-
95
-
96
-
97
-
98
-
99
-
100
-
101
-
102
-
103
-
104
-
105
-
106
-
107
-
108
-
109
-
110
-
111
-
112
-
113
-
114
-
115
-
116
 |
 |