Brother International HL-3075CW Network Users Manual - English - Page 100
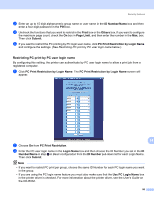
Restricting PC print by PC user login name, PC Print Restriction by Login Name
 |
View all Brother International HL-3075CW manuals
Add to My Manuals
Save this manual to your list of manuals |
Page 100 highlights
Security features c Enter an up to 15 digit alphanumeric group name or user name in the ID Number/Name box and then enter a four-digit password in the PIN box. d Uncheck the functions that you want to restrict in the Print box or the Others box. If you want to configure the maximum page count, check the On box in Page Limit, and then enter the number in the Max. box. Then click Submit. e If you want to restrict the PC printing by PC login user name, click PC Print Restriction by Login Name and configure the settings. (See Restricting PC print by PC user login name below.) Restricting PC print by PC user login name 14 By configuring this setting, the printer can authenticate by PC user login name to allow a print job from a registered computer. a Click PC Print Restriction by Login Name. The PC Print Restriction by Login Name screen will appear. 14 b Choose On from PC Print Restriction. c Enter the PC user login name in the Login Name box and then choose the ID Number you set in the ID Number/Name in step c in Basic configuration from the ID Number pull-down list for each Login Name. Then click Submit. Note • If you want to restrict PC print per group, choose the same ID Number for each PC login name you want in the group. • If you are using the PC login name feature you must also make sure that the Use PC Login Name box in the printer driver is checked. For more information about the printer driver, see the User's Guide on the CD-ROM. 90
-
 1
1 -
2
-
3
-
4
-
5
-
6
-
7
-
8
-
9
-
10
-
11
-
12
-
13
-
14
-
15
-
16
-
17
-
18
-
19
-
20
-
21
-
22
-
23
-
24
-
25
-
26
-
27
-
28
-
29
-
30
-
31
-
32
-
33
-
34
-
35
-
36
-
37
-
38
-
39
-
40
-
41
-
42
-
43
-
44
-
45
-
46
-
47
-
48
-
49
-
50
-
51
-
52
-
53
-
54
-
55
-
56
-
57
-
58
-
59
-
60
-
61
-
62
-
63
-
64
-
65
-
66
-
67
-
68
-
69
-
70
-
71
-
72
-
73
-
74
-
75
-
76
-
77
-
78
-
79
-
80
-
81
-
82
-
83
-
84
-
85
-
86
-
87
-
88
-
89
-
90
-
91
-
92
-
93
-
94
-
 95
95 -
 96
96 -
 97
97 -
 98
98 -
 99
99 -
 100
100 -
 101
101 -
 102
102 -
 103
103 -
 104
104 -
 105
105 -
106
-
107
-
108
-
109
-
110
-
111
-
112
-
113
-
114
-
115
-
116
-
117
-
118
-
119
-
120
-
121
-
122
-
123
-
124
-
125
-
126
-
127
-
128
-
129
-
130
-
131
-
132
-
133
-
134
-
135
-
136
-
137
-
138
-
139
-
140
-
141
-
142
-
143
 |
 |
