Brother International HL-3075CW Network Users Manual - English - Page 107
Creating and installing a self-signed certificate
 |
View all Brother International HL-3075CW manuals
Add to My Manuals
Save this manual to your list of manuals |
Page 107 highlights
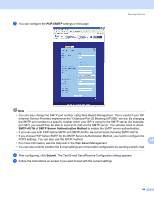
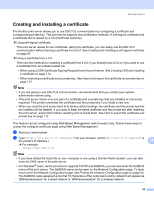
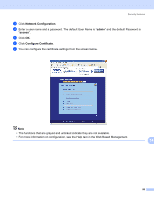
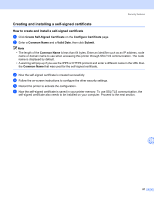
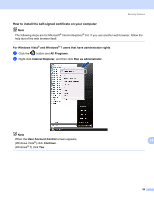
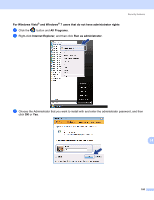
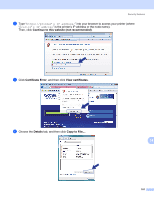
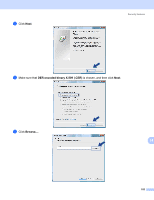
Security features Creating and installing a self-signed certificate 14 How to create and install a self-signed certificate 14 a Click Create Self-Signed Certificate on the Configure Certificate page. b Enter a Common Name and a Valid Date, then click Submit. Note • The length of the Common Name is less than 64 bytes. Enter an identifier such as an IP address, node name or domain name to use when accessing this printer through SSL/TLS communication. The node name is displayed by default. • A warning will pop-up if you use the IPPS or HTTPS protocol and enter a different name in the URL than the Common Name that was used for the self-signed certificate. c Now the self-signed certificate is created successfully. d Follow the on-screen instructions to configure the other security settings. e Restart the printer to activate the configuration. f Now the self-signed certificate is saved in your printer memory. To use SSL/TLS communication, the self-signed certificate also needs to be installed on your computer. Proceed to the next section. 14 97
-
 1
1 -
2
-
3
-
4
-
5
-
6
-
7
-
8
-
9
-
10
-
11
-
12
-
13
-
14
-
15
-
16
-
17
-
18
-
19
-
20
-
21
-
22
-
23
-
24
-
25
-
26
-
27
-
28
-
29
-
30
-
31
-
32
-
33
-
34
-
35
-
36
-
37
-
38
-
39
-
40
-
41
-
42
-
43
-
44
-
45
-
46
-
47
-
48
-
49
-
50
-
51
-
52
-
53
-
54
-
55
-
56
-
57
-
58
-
59
-
60
-
61
-
62
-
63
-
64
-
65
-
66
-
67
-
68
-
69
-
70
-
71
-
72
-
73
-
74
-
75
-
76
-
77
-
78
-
79
-
80
-
81
-
82
-
83
-
84
-
85
-
86
-
87
-
88
-
89
-
90
-
91
-
92
-
93
-
94
-
95
-
96
-
97
-
98
-
99
-
100
-
101
-
 102
102 -
 103
103 -
 104
104 -
 105
105 -
 106
106 -
 107
107 -
 108
108 -
 109
109 -
 110
110 -
 111
111 -
 112
112 -
113
-
114
-
115
-
116
-
117
-
118
-
119
-
120
-
121
-
122
-
123
-
124
-
125
-
126
-
127
-
128
-
129
-
130
-
131
-
132
-
133
-
134
-
135
-
136
-
137
-
138
-
139
-
140
-
141
-
142
-
143
 |
 |
