Brother International HL-3075CW Network Users Manual - English - Page 137
Installation when using Web Services (For Windows Vista® and Windows® 7 users
 |
View all Brother International HL-3075CW manuals
Add to My Manuals
Save this manual to your list of manuals |
Page 137 highlights
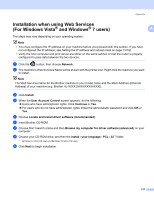
Appendix Installation when using Web Services (For Windows Vista® and Windows® 7 users) A 0 The steps may vary depending on your operating system. Note • You must configure the IP address on your machine before you proceed with this section. If you have not configured the IP address, see Setting the IP address and subnet mask on page 13 first. • Verify the host computer and print server are either on the same subnet, or that the router is properly configured to pass data between the two devices. a Click the button, then choose Network. b The machine's Web Services Name will be shown with the printer icon. Right-click the machine you want to install. Note The Web Services Name for the Brother machine is your model name and the MAC Address (Ethernet Address) of your machine (e.g. Brother HL-XXXX [XXXXXXXXXXXX]). c Click Install. d When the User Account Control screen appears, do the following. „ Users who have administrator rights: Click Continue or Yes. „ For users who do not have administrator rights: Enter the administrator password and click OK or Yes. e Choose Locate and install driver software (recommended). f Insert Brother CD-ROM. g Choose Don't search online and then Browse my computer for driver software (advanced) on your computer. h Choose your CD-ROM drive, and then the install \ your language \ PCL \ 32 1 folder. 1 32 folder for 32-bit OS users and 64 folder for 64-bit OS users i Click Next to begin installation. 127
-
 1
1 -
2
-
3
-
4
-
5
-
6
-
7
-
8
-
9
-
10
-
11
-
12
-
13
-
14
-
15
-
16
-
17
-
18
-
19
-
20
-
21
-
22
-
23
-
24
-
25
-
26
-
27
-
28
-
29
-
30
-
31
-
32
-
33
-
34
-
35
-
36
-
37
-
38
-
39
-
40
-
41
-
42
-
43
-
44
-
45
-
46
-
47
-
48
-
49
-
50
-
51
-
52
-
53
-
54
-
55
-
56
-
57
-
58
-
59
-
60
-
61
-
62
-
63
-
64
-
65
-
66
-
67
-
68
-
69
-
70
-
71
-
72
-
73
-
74
-
75
-
76
-
77
-
78
-
79
-
80
-
81
-
82
-
83
-
84
-
85
-
86
-
87
-
88
-
89
-
90
-
91
-
92
-
93
-
94
-
95
-
96
-
97
-
98
-
99
-
100
-
101
-
102
-
103
-
104
-
105
-
106
-
107
-
108
-
109
-
110
-
111
-
112
-
113
-
114
-
115
-
116
-
117
-
118
-
119
-
120
-
121
-
122
-
123
-
124
-
125
-
126
-
127
-
128
-
129
-
130
-
131
-
 132
132 -
 133
133 -
 134
134 -
 135
135 -
 136
136 -
 137
137 -
 138
138 -
 139
139 -
 140
140 -
 141
141 -
 142
142 -
143
 |
 |
