Brother International LT2-B845 Instruction Manual - Multi - Page 30
Standaizi, Adjustnients, Standaizdeinstellungen, Regiages, S'iandaizi, A,ristes
 |
View all Brother International LT2-B845 manuals
Add to My Manuals
Save this manual to your list of manuals |
Page 30 highlights
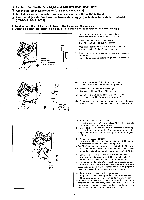
STANDAIZI) ADJUSTNIENTS STANDAIZDEINSTELLUNGEN REGIAGES S'IANDAIZI) A,RISTES El Adjustment of the Needles and Feed-Timing Einstellung des Nadel- und Transporteurgleichlaufs El Synchronisation des aiguilles et de l'entrainement ffi Ajuste de la sincronizaci6n de las agujas y la alimentacion [LT2-6841] Mark Markierung Repere Marca Red dot Roter Punkt Point rouge Punto rojo [LT2-B842, 8845, B847, B848] [LT2-8872, B8751 Red dot Roter Punkt Point rouge Punta rojo Reference line Referenzlinie Ligne de reference Linea de referencia 1. Remove the needles. 2. Tilt the machine head back and remove the timing belt 0. 3. Turn the machine pulley until the "A" mark is aligned with the red dot. 4. While holding the upper shaft so that it won't move, align the arrow on the lower belt pulley 0 with the reference line on the arm bed, and attach the timing belt 0. 5. Return the machine head to its original position, and install the needles. 1. Die Nadeln entfernen. 2. Das Maschinenoberteil umkippen und den Gleichlaufriemen 0 entfernen. 3. Die Riemenscheibe drehen, bis die Markierung "A" mit dem roten Punkt ausgerichtet ist. 0 4. Die obere Riemenwelle festhalten und den Pfeil auf der unteren Riemenscheibe mit der entsprechenden Linie auf dem Wellenlagergehause ausrichten und den Gleichlaufriemen 0 anbringen. 5. Das Maschinenoberteil wieder zuriickstellen und die Nadeln einsetzen. 1. Enlever les aiguilles. 2. Basculer la tete de la machine vers l'arriere et enlever la courroie de synchronisation 0. 3. Tourner la poulie de la machine afin que le repere "A" soit aligne 4,livec le trait rouge. 4. Le bras superieur etant immobile, aligner la fleche sur la poulie inferieure de courroie 0 avec le repere sur le socle du bras. Installer la courroie de synchronisation 0. 5. Remettre la tete de la machine en place et installer les aiguilles. 1. Quitar las agujas. 2. Incliner la cabeza de la maquina hacia atras y guitar la correa sincronizadora 0. 3. Hacer girar la polea de la maquina hasta que la marca "A" se encuentre alineada con el punto rojo. 4. Mientras se sostiene el arbol superior para que no se mueva, alinear la flecha en la polea de la correa inferior 0 con la linea de referenda en la plancha de montaje del brazo, y colocar la correa sincronizadora 0. 5. Colocar la cabeza de la maquina de nuevo en su posici6n original e instalar las agujas. - 25 -
-
 1
1 -
2
-
3
-
4
-
5
-
6
-
7
-
8
-
9
-
10
-
11
-
12
-
13
-
14
-
15
-
16
-
17
-
18
-
19
-
20
-
21
-
22
-
23
-
24
-
 25
25 -
 26
26 -
 27
27 -
 28
28 -
 29
29 -
 30
30 -
 31
31 -
 32
32 -
 33
33 -
 34
34 -
 35
35 -
36
-
37
-
38
-
39
-
40
-
41
-
42
-
43
-
44
-
45
-
46
 |
 |
