Canon PIXMA MP530 User's Guide - Page 106
Printing the Nozzle Check Pattern, Step 1
 |
View all Canon PIXMA MP530 manuals
Add to My Manuals
Save this manual to your list of manuals |
Page 106 highlights
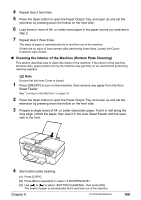
Step 1 See "Printing the Nozzle Check Pattern" on page 104 If missing lines or white stripes appear After Print Head cleaning, print the nozzle check pattern. Step 2 See "Print Head Cleaning" on page 105 If the problem remains after performing Print Head cleaning twice Step 3 See "Print Head Deep Cleaning" on page 106 Note If [Print Head Deep Cleaning] does not resolve the problem, contact the Canon Customer Care Center. z If the ruled lines are shifted Step 1 See "Aligning the Print Head Automatically" on page 106 Printing the Nozzle Check Pattern Print the nozzle check pattern to determine whether the ink ejects properly from the Print Head nozzles and to verify Print Head alignment. Use this function when printed results are blurred or the color is incorrect. Note Ensure that the Inner Cover is closed. 1 Press [ON/OFF] to turn on the machine, then load a sheet of A4 or Letter-sized plain paper in the Auto Sheet Feeder or Cassette. See "Turning on the Machine" on page 18 and "Loading Paper" on page 22. 2 Use [Feed Switch] to select the paper source where you have loaded paper. 3 Printing the nozzle check pattern. (1) Press [COPY]. (2) Press [Menu] repeatedly to select . 104 Routine Maintenance Chapter 8
-
 1
1 -
2
-
3
-
4
-
5
-
6
-
7
-
8
-
9
-
10
-
11
-
12
-
13
-
14
-
15
-
16
-
17
-
18
-
19
-
20
-
21
-
22
-
23
-
24
-
25
-
26
-
27
-
28
-
29
-
30
-
31
-
32
-
33
-
34
-
35
-
36
-
37
-
38
-
39
-
40
-
41
-
42
-
43
-
44
-
45
-
46
-
47
-
48
-
49
-
50
-
51
-
52
-
53
-
54
-
55
-
56
-
57
-
58
-
59
-
60
-
61
-
62
-
63
-
64
-
65
-
66
-
67
-
68
-
69
-
70
-
71
-
72
-
73
-
74
-
75
-
76
-
77
-
78
-
79
-
80
-
81
-
82
-
83
-
84
-
85
-
86
-
87
-
88
-
89
-
90
-
91
-
92
-
93
-
94
-
95
-
96
-
97
-
98
-
99
-
100
-
 101
101 -
 102
102 -
 103
103 -
 104
104 -
 105
105 -
 106
106 -
 107
107 -
 108
108 -
 109
109 -
 110
110 -
 111
111 -
112
-
113
-
114
-
115
-
116
-
117
-
118
-
119
-
120
-
121
-
122
-
123
-
124
-
125
-
126
-
127
-
128
-
129
-
130
-
131
-
132
-
133
-
134
-
135
-
136
-
137
-
138
-
139
-
140
-
141
-
142
-
143
-
144
-
145
-
146
-
147
-
148
-
149
-
150
-
151
-
152
-
153
-
154
-
155
-
156
-
157
-
158
-
159
-
160
-
161
-
162
-
163
-
164
-
165
-
166
-
167
-
168
-
169
-
170
-
171
-
172
-
173
-
174
-
175
-
176
 |
 |
