Canon PIXMA MP530 User's Guide - Page 107
Print Head Cleaning, Examining the Nozzle Check Pattern
 |
View all Canon PIXMA MP530 manuals
Add to My Manuals
Save this manual to your list of manuals |
Page 107 highlights
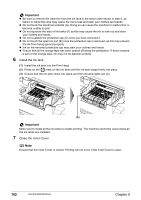
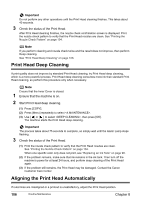
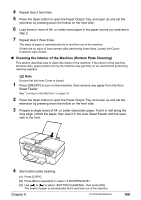
(3) Use [ ] or [ ] to select and then press [OK]. The nozzle check pattern is printed. 4 Examine the pattern and take the appropriate action. See "Examining the Nozzle Check Pattern" on page 105. „ Examining the Nozzle Check Pattern Examine the nozzle check pattern. Perform cleaning if necessary. Note If the ink level is low, the nozzle check pattern is not printed correctly. Replace the relevant ink tank (See "Replacing an Ink Tank" on page 98). (A) z If the lines are broken (1), or white lines are present (2) in the pattern (A), clean the print head (See "Print Head Cleaning" on page 105). (1) (2) Print Head Cleaning Clean the Print Head if missing lines or white stripes appear in the nozzle check pattern. This unclogs the nozzles to restore the Print Head condition. Note that cleaning the Print Head causes waste ink to be absorbed in the waste ink absorber. Cleaning the Print Head consumes ink, so perform Print Head cleaning only when necessary. Note Ensure that the Inner Cover is closed. 1 Ensure that the machine is on. 2 Start the Print Head cleaning. (1) Press [COPY]. (2) Press [Menu] repeatedly to select . (3) Use [ ] or [ ] to select , then press [OK]. The machine starts the Print Head cleaning. Chapter 8 Routine Maintenance 105
-
 1
1 -
2
-
3
-
4
-
5
-
6
-
7
-
8
-
9
-
10
-
11
-
12
-
13
-
14
-
15
-
16
-
17
-
18
-
19
-
20
-
21
-
22
-
23
-
24
-
25
-
26
-
27
-
28
-
29
-
30
-
31
-
32
-
33
-
34
-
35
-
36
-
37
-
38
-
39
-
40
-
41
-
42
-
43
-
44
-
45
-
46
-
47
-
48
-
49
-
50
-
51
-
52
-
53
-
54
-
55
-
56
-
57
-
58
-
59
-
60
-
61
-
62
-
63
-
64
-
65
-
66
-
67
-
68
-
69
-
70
-
71
-
72
-
73
-
74
-
75
-
76
-
77
-
78
-
79
-
80
-
81
-
82
-
83
-
84
-
85
-
86
-
87
-
88
-
89
-
90
-
91
-
92
-
93
-
94
-
95
-
96
-
97
-
98
-
99
-
100
-
101
-
 102
102 -
 103
103 -
 104
104 -
 105
105 -
 106
106 -
 107
107 -
 108
108 -
 109
109 -
 110
110 -
 111
111 -
 112
112 -
113
-
114
-
115
-
116
-
117
-
118
-
119
-
120
-
121
-
122
-
123
-
124
-
125
-
126
-
127
-
128
-
129
-
130
-
131
-
132
-
133
-
134
-
135
-
136
-
137
-
138
-
139
-
140
-
141
-
142
-
143
-
144
-
145
-
146
-
147
-
148
-
149
-
150
-
151
-
152
-
153
-
154
-
155
-
156
-
157
-
158
-
159
-
160
-
161
-
162
-
163
-
164
-
165
-
166
-
167
-
168
-
169
-
170
-
171
-
172
-
173
-
174
-
175
-
176
 |
 |
