Canon PowerShot A70 Software Starter Guide (For the Canon Digital Camera Solut - Page 34
Using the Software on the Windows Platform - Advanced Techniques - manual pdf
 |
View all Canon PowerShot A70 manuals
Add to My Manuals
Save this manual to your list of manuals |
Page 34 highlights
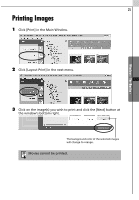
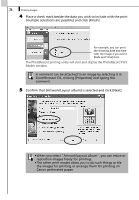
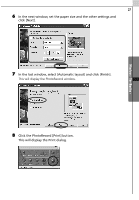
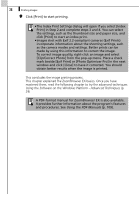
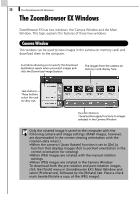
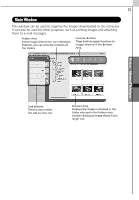
28 Printing Images 9 Click [Print] to start printing. •The Index Print Settings dialog will open if you select [Index Print] in Step 2 and complete steps 3 and 4. You can select the settings, such as the thumbnail size and paper size, and click [Print] to start an index print. •Images shot with Exif 2.2-compliant cameras (Exif Prints) incorporate information about the shooting settings, such as the camera modes and settings. Better prints can be made by using this information to correct the image. To correct image quality, right-click an image and select [Clip/Correct Photo] from the pop-up menu. Place a check mark beside [Exif Print] or [Photo Optimizer Pro] in the next window and click [Close] to have it corrected. You should obtain better results when the image is printed. This concludes the image printing process. This chapter explained the ZoomBrowser EX basics. Once you have mastered them, read the following chapter to try the advanced techniques. Using the Software on the Windows Platform - Advanced Techniques (p. 29) A PDF-format manual for ZoomBrowser EX is also available. It provides further information about the program's features and procedures. See Using the PDF Manuals (p. 109).
-
 1
1 -
2
-
3
-
4
-
5
-
6
-
7
-
8
-
9
-
10
-
11
-
12
-
13
-
14
-
15
-
16
-
17
-
18
-
19
-
20
-
21
-
22
-
23
-
24
-
25
-
26
-
27
-
28
-
 29
29 -
 30
30 -
 31
31 -
 32
32 -
 33
33 -
 34
34 -
 35
35 -
 36
36 -
 37
37 -
 38
38 -
 39
39 -
40
-
41
-
42
-
43
-
44
-
45
-
46
-
47
-
48
-
49
-
50
-
51
-
52
-
53
-
54
-
55
-
56
-
57
-
58
-
59
-
60
-
61
-
62
-
63
-
64
-
65
-
66
-
67
-
68
-
69
-
70
-
71
-
72
-
73
-
74
-
75
-
76
-
77
-
78
-
79
-
80
-
81
-
82
-
83
-
84
-
85
-
86
-
87
-
88
-
89
-
90
-
91
-
92
-
93
-
94
-
95
-
96
-
97
-
98
-
99
-
100
-
101
-
102
-
103
-
104
-
105
-
106
-
107
-
108
-
109
-
110
-
111
-
112
-
113
-
114
-
115
-
116
-
117
-
118
-
119
-
120
-
121
-
122
-
123
-
124
-
125
-
126
-
127
-
128
-
129
-
130
-
131
-
132
-
133
-
134
-
135
-
136
-
137
-
138
 |
 |