Canon PowerShot A70 Software Starter Guide (For the Canon Digital Camera Solut - Page 73
box and [Image Correction Settings].
 |
View all Canon PowerShot A70 manuals
Add to My Manuals
Save this manual to your list of manuals |
Page 73 highlights
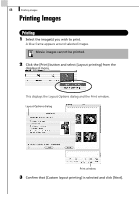
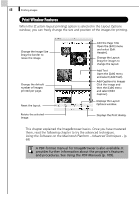
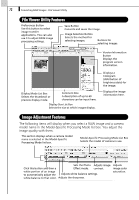
67 •Selecting the [Custom layout printing] option allows you to freely specify the image size and position for printing. •Selecting an alternative option allows you to print the images in an index or in a tiled arrangement. The [Canon perforated paper printing] option can be selected with Mac OS 9. 4 Select settings, such as the paper size, and click [OK]. This will close the Layout Options dialog and allow you to change the layout and print settings in the Print window. The settings available in Step 4 will vary according to the type of layout selected in Step 3. 5 Adjust the page layout in the Print window if you wish. See Print Window Features (p. 68) for information about changing layouts. 6 Click the [Print] button in the Print window. This will display the Print dialog. 7 Click [OK] to start printing. •You can start an index print by selecting [Index printing] in Step 2. •Images shot with Exif 2.2-compliant cameras (Exif Prints) incorporate information about the shooting settings, such as the camera modes and settings. Better prints can be made by using this information to correct the image. You can set this function by clicking the [ImageBrowser] menu and selecting [Preferences] (in Mac OS 9, click the [Edit] menu to select [Preferences]), followed by [Print] in the list box and [Image Correction Settings]. This concludes the image printing process. Macintosh - The Basics -
-
 1
1 -
2
-
3
-
4
-
5
-
6
-
7
-
8
-
9
-
10
-
11
-
12
-
13
-
14
-
15
-
16
-
17
-
18
-
19
-
20
-
21
-
22
-
23
-
24
-
25
-
26
-
27
-
28
-
29
-
30
-
31
-
32
-
33
-
34
-
35
-
36
-
37
-
38
-
39
-
40
-
41
-
42
-
43
-
44
-
45
-
46
-
47
-
48
-
49
-
50
-
51
-
52
-
53
-
54
-
55
-
56
-
57
-
58
-
59
-
60
-
61
-
62
-
63
-
64
-
65
-
66
-
67
-
 68
68 -
 69
69 -
 70
70 -
 71
71 -
 72
72 -
 73
73 -
 74
74 -
 75
75 -
 76
76 -
 77
77 -
 78
78 -
79
-
80
-
81
-
82
-
83
-
84
-
85
-
86
-
87
-
88
-
89
-
90
-
91
-
92
-
93
-
94
-
95
-
96
-
97
-
98
-
99
-
100
-
101
-
102
-
103
-
104
-
105
-
106
-
107
-
108
-
109
-
110
-
111
-
112
-
113
-
114
-
115
-
116
-
117
-
118
-
119
-
120
-
121
-
122
-
123
-
124
-
125
-
126
-
127
-
128
-
129
-
130
-
131
-
132
-
133
-
134
-
135
-
136
-
137
-
138
 |
 |