Canon PowerShot A70 Software Starter Guide (For the Canon Digital Camera Solut - Page 84
Changing, the File Destination and Method of Saving
 |
View all Canon PowerShot A70 manuals
Add to My Manuals
Save this manual to your list of manuals |
Page 84 highlights
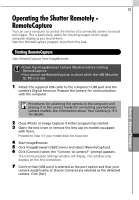
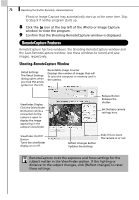
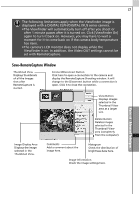
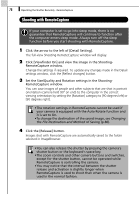
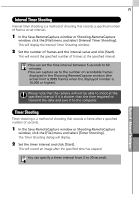
78 Operating the Shutter Remotely - RemoteCapture Shooting with RemoteCapture If your computer is set to go into sleep mode, there is no guarantee that RemoteCapture will continue to function after the computer enters sleep mode. Always turn off the sleep function before you start shooting with RemoteCapture. 1 Click the arrow to the left of [Detail Setting]. The full-view Shooting-RemoteCapture window will display. 2 Click [Viewfinder On] and view the image in the Shooting- RemoteCapture window. Change the settings if required. To update any changes made in the Detail settings window, click the [Reflect changes] button. 3 Set the Size/Quality and Rotation settings in the Shooting- RemoteCapture window. You can save images of people and other subjects that are shot in portrait orientation (camera held 90° on end) to the computer in the correct viewing orientation by setting the [Rotation] category to [90 degrees left] or [90 degrees right]. •The rotation settings in RemoteCapture cannot be used if your camera is equipped with the Auto Rotate function and it is set to On. •To change the destination of the saved image, see Changing the File Destination and Method of Saving (p.80). 4 Click the [Release] button. Images shot with RemoteCapture are automatically saved to the folder selected in ImageBrowser. •You can also release the shutter by pressing the camera's shutter button or the keyboard's space key. •The zoom controls and other camera buttons and switches, except for the shutter button, cannot be operated while RemoteCapture is controlling the camera. •You may notice that the interval between the shutter release and activation is slightly longer when RemoteCapture is used to shoot than when the camera is used in the normal fashion.
-
 1
1 -
2
-
3
-
4
-
5
-
6
-
7
-
8
-
9
-
10
-
11
-
12
-
13
-
14
-
15
-
16
-
17
-
18
-
19
-
20
-
21
-
22
-
23
-
24
-
25
-
26
-
27
-
28
-
29
-
30
-
31
-
32
-
33
-
34
-
35
-
36
-
37
-
38
-
39
-
40
-
41
-
42
-
43
-
44
-
45
-
46
-
47
-
48
-
49
-
50
-
51
-
52
-
53
-
54
-
55
-
56
-
57
-
58
-
59
-
60
-
61
-
62
-
63
-
64
-
65
-
66
-
67
-
68
-
69
-
70
-
71
-
72
-
73
-
74
-
75
-
76
-
77
-
78
-
 79
79 -
 80
80 -
 81
81 -
 82
82 -
 83
83 -
 84
84 -
 85
85 -
 86
86 -
 87
87 -
 88
88 -
 89
89 -
90
-
91
-
92
-
93
-
94
-
95
-
96
-
97
-
98
-
99
-
100
-
101
-
102
-
103
-
104
-
105
-
106
-
107
-
108
-
109
-
110
-
111
-
112
-
113
-
114
-
115
-
116
-
117
-
118
-
119
-
120
-
121
-
122
-
123
-
124
-
125
-
126
-
127
-
128
-
129
-
130
-
131
-
132
-
133
-
134
-
135
-
136
-
137
-
138
 |
 |