Canon VIXIA HF20 VIXIA HF20 / HF200 Manual - Page 78
Manual Adjustment of the Audio Recording Level - mic
 |
View all Canon VIXIA HF20 manuals
Add to My Manuals
Save this manual to your list of manuals |
Page 78 highlights
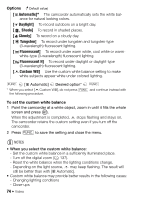
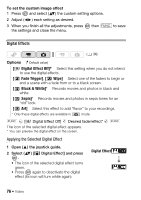
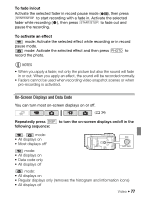
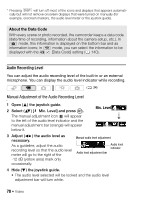
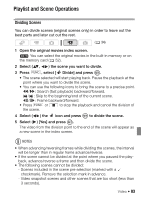
* Pressing DISP. will turn off most of the icons and displays that appears automatically but will not remove onscreen displays that were turned on manually (for example, onscreen markers, the audio level meter or the joystick guide). About the Data Code With every scene or photo recorded, the camcorder keeps a data code (date/time of recording, information about the camera setup, etc.). In mode, this information is displayed on the bottom bar and as information icons; in mode, you can select the information to be displayed with the [Data Code] setting ( 140). Audio Recording Level You can adjust the audio recording level of the built-in or an external microphone. You can display the audio level indicator while recording. ( 34) Manual Adjustment of the Audio Recording Level 1 Open ( ) the joystick guide. 2 Select ( ) [ Mic. Level] and press . The manual adjustment icon will appear to the left of the audio level indicator and the manual adjustment bar (orange) will appear below it. Mic. Level 3 Adjust ( ) the audio level as necessary. As a guideline, adjust the audio recording level so that the audio level meter will go to the right of the -12 dB (yellow area) mark only occasionally. Manual audio level adjustment Audio level indicator Audio level adjustment bar 4 Hide ( ) the joystick guide. • The audio level selected will be locked and the audio level adjustment bar will turn white. 78 Š Video
-
 1
1 -
2
-
3
-
4
-
5
-
6
-
7
-
8
-
9
-
10
-
11
-
12
-
13
-
14
-
15
-
16
-
17
-
18
-
19
-
20
-
21
-
22
-
23
-
24
-
25
-
26
-
27
-
28
-
29
-
30
-
31
-
32
-
33
-
34
-
35
-
36
-
37
-
38
-
39
-
40
-
41
-
42
-
43
-
44
-
45
-
46
-
47
-
48
-
49
-
50
-
51
-
52
-
53
-
54
-
55
-
56
-
57
-
58
-
59
-
60
-
61
-
62
-
63
-
64
-
65
-
66
-
67
-
68
-
69
-
70
-
71
-
72
-
 73
73 -
 74
74 -
 75
75 -
 76
76 -
 77
77 -
 78
78 -
 79
79 -
 80
80 -
 81
81 -
 82
82 -
 83
83 -
84
-
85
-
86
-
87
-
88
-
89
-
90
-
91
-
92
-
93
-
94
-
95
-
96
-
97
-
98
-
99
-
100
-
101
-
102
-
103
-
104
-
105
-
106
-
107
-
108
-
109
-
110
-
111
-
112
-
113
-
114
-
115
-
116
-
117
-
118
-
119
-
120
-
121
-
122
-
123
-
124
-
125
-
126
-
127
-
128
-
129
-
130
-
131
-
132
-
133
-
134
-
135
-
136
-
137
-
138
-
139
-
140
-
141
-
142
-
143
-
144
-
145
-
146
-
147
-
148
-
149
-
150
-
151
-
152
-
153
-
154
-
155
-
156
-
157
-
158
-
159
-
160
-
161
-
162
-
163
-
164
-
165
-
166
-
167
-
168
-
169
-
170
-
171
-
172
-
173
-
174
-
175
-
176
-
177
-
178
-
179
-
180
-
181
-
182
-
183
-
184
-
185
-
186
 |
 |