Cisco WS-C3560E-48PD-SF Hardware Installation Guide - Page 63
Box Contents, Tools and Equipment, Verifying Switch Operation, Powering Off the Switch
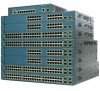 |
View all Cisco WS-C3560E-48PD-SF manuals
Add to My Manuals
Save this manual to your list of manuals |
Page 63 highlights
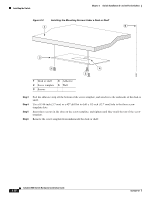
Chapter 3 Switch Installation (8- and 12-Port Switches) Verifying Switch Operation Box Contents The switch getting started guide on Cisco.com describes the box contents. If any item is missing or damaged, contact your Cisco representative or reseller for support. Tools and Equipment You need to supply a number-2 Phillips screwdriver to rack-mount the switch. Verifying Switch Operation Before you install the switch, power it on and verify that it passes POST. See the getting started guide for the steps required to connect a PC to the switch and to run Express Setup. To power on the switch, connect one end of the AC power cord to the AC power connector on the switch, and connect the other end of the power cord to an AC power outlet. When the switch powers on, it automatically begins the POST, a series of tests that verifies that the switch functions properly. When the switch begins POST, the system LED slowly blinks green. When POST completes, the system LED blinks amber. If POST fails, the system LED remains amber. If POST completes successfully, the system LED rapidly blinks green. Call Cisco technical support representative if your switch fails POST. Powering Off the Switch After a successful POST, disconnect the power cord from the switch. Install the switch in a rack, on a wall, on a table, or on a shelf as described in the "Installing the Switch" section on page 3-7. Installing the Switch • Desk or Shelf Mounting, page 3-8 • Wall-Mounting (with Mounting Screws), page 3-12 • Magnet Mounting, page 3-15 • Rack-Mounting, page 3-16 • Wall-Mounting (with Rack-Mount Brackets), page 3-17 • Securing the AC Power Cord, page 3-19 Before installing the switch, review the "Installation Guidelines" section on page 3-5. OL-6337-07 Catalyst 3560 Switch Hardware Installation Guide 3-7
-
 1
1 -
2
-
3
-
4
-
5
-
6
-
7
-
8
-
9
-
10
-
11
-
12
-
13
-
14
-
15
-
16
-
17
-
18
-
19
-
20
-
21
-
22
-
23
-
24
-
25
-
26
-
27
-
28
-
29
-
30
-
31
-
32
-
33
-
34
-
35
-
36
-
37
-
38
-
39
-
40
-
41
-
42
-
43
-
44
-
45
-
46
-
47
-
48
-
49
-
50
-
51
-
52
-
53
-
54
-
55
-
56
-
57
-
 58
58 -
 59
59 -
 60
60 -
 61
61 -
 62
62 -
 63
63 -
 64
64 -
 65
65 -
 66
66 -
 67
67 -
 68
68 -
69
-
70
-
71
-
72
-
73
-
74
-
75
-
76
-
77
-
78
-
79
-
80
-
81
-
82
-
83
-
84
-
85
-
86
-
87
-
88
-
89
-
90
-
91
-
92
-
93
-
94
-
95
-
96
-
97
-
98
-
99
-
100
-
101
-
102
-
103
-
104
-
105
-
106
-
107
-
108
-
109
-
110
-
111
-
112
-
113
-
114
-
115
-
116
-
117
-
118
-
119
-
120
 |
 |
