Dell Inspiron 7000 Dell Inspiron 7000 Reference and Troubleshooting Guide - Page 61
Turn the computer over and remove the two screws at the front of the hard-disk
 |
View all Dell Inspiron 7000 manuals
Add to My Manuals
Save this manual to your list of manuals |
Page 61 highlights
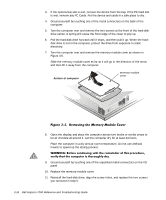
12. Reinstall the options-bay device or PC Cards that you removed in step 3. 13. Replace any batteries that you removed in step 2. 14. Reconnect the computer and peripherals to AC power and turn them on. 15. Does the computer work properly? Yes. The problem is resolved. No. If the computer is able to boot, run the Dell Diagnostics to identify computer damage. If the computer is unable to boot, see "Troubleshooting a Power Failure" found later in this section. If you cannot identify the damaged component(s), call Dell for technical assistance. (See Chapter 5, "Getting Help," for instructions.) If the computer is dropped or damaged, use the following procedure: 1. Save all your work, exit any open application programs, and remove any installed batteries. 2. Turn off the computer and disconnect it from the AC adapter. Then disconnect the AC adapter from AC power. Turn off any attached peripherals and disconnect them from their power sources and then from the computer. 3. Ground yourself by touching one of the metal connectors on the back of the computer. 4. Turn the computer over and remove the two screws at the front of the hard-disk drive carrier. A spring will cause the front edge of the cover to pop up. 5. Pull the hard-disk drive forward until it stops, and then pull it up. When the harddisk drive is not in the computer, protect the drive from exposure to static electricity. 6. Turn the computer over, and remove the memory module cover as shown in Figure 3-6. Slide the memory module cover as far as it will go in the direction of the arrow and then lift it away from the computer. Troubleshooting Your Computer 3-15
-
 1
1 -
2
-
3
-
4
-
5
-
6
-
7
-
8
-
9
-
10
-
11
-
12
-
13
-
14
-
15
-
16
-
17
-
18
-
19
-
20
-
21
-
22
-
23
-
24
-
25
-
26
-
27
-
28
-
29
-
30
-
31
-
32
-
33
-
34
-
35
-
36
-
37
-
38
-
39
-
40
-
41
-
42
-
43
-
44
-
45
-
46
-
47
-
48
-
49
-
50
-
51
-
52
-
53
-
54
-
55
-
 56
56 -
 57
57 -
 58
58 -
 59
59 -
 60
60 -
 61
61 -
 62
62 -
 63
63 -
 64
64 -
 65
65 -
 66
66 -
67
-
68
-
69
-
70
-
71
-
72
-
73
-
74
-
75
-
76
-
77
-
78
-
79
-
80
-
81
-
82
-
83
-
84
-
85
-
86
-
87
-
88
-
89
-
90
-
91
-
92
-
93
-
94
-
95
-
96
-
97
-
98
-
99
-
100
-
101
-
102
-
103
-
104
-
105
-
106
-
107
-
108
-
109
-
110
-
111
-
112
-
113
-
114
-
115
-
116
-
117
-
118
-
119
-
120
-
121
-
122
-
123
-
124
-
125
-
126
-
127
-
128
-
129
-
130
-
131
-
132
-
133
-
134
-
135
-
136
-
137
-
138
-
139
-
140
-
141
-
142
-
143
-
144
-
145
-
146
-
147
-
148
-
149
-
150
-
151
-
152
-
153
-
154
-
155
-
156
-
157
-
158
-
159
-
160
-
161
 |
 |