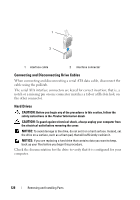
Dell Vostro 200 Owner's Manual - Page 133
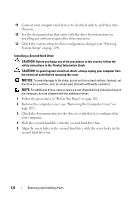
Replace and tighten the four screws to secure the hard drive.
 |
View all Dell Vostro 200 manuals
Add to My Manuals
Save this manual to your list of manuals |
Page 133 highlights
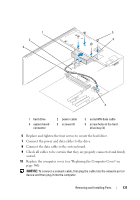
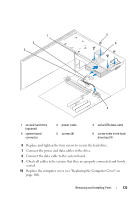
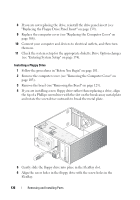
1 2 3 5 6 4 1 second hard drive (optional) 4 system board connector 2 power cable 5 screws (4) 3 serial ATA data cable 6 screw holes in the hard drive bay (4) 6 Replace and tighten the four screws to secure the hard drive. 7 Connect the power and data cables to the drive. 8 Connect the data cable to the system board. 9 Check all cables to be certain that they are properly connected and firmly seated. 10 Replace the computer cover (see "Replacing the Computer Cover" on page 166). Removing and Installing Parts 133
-
 1
1 -
2
-
3
-
4
-
5
-
6
-
7
-
8
-
9
-
10
-
11
-
12
-
13
-
14
-
15
-
16
-
17
-
18
-
19
-
20
-
21
-
22
-
23
-
24
-
25
-
26
-
27
-
28
-
29
-
30
-
31
-
32
-
33
-
34
-
35
-
36
-
37
-
38
-
39
-
40
-
41
-
42
-
43
-
44
-
45
-
46
-
47
-
48
-
49
-
50
-
51
-
52
-
53
-
54
-
55
-
56
-
57
-
58
-
59
-
60
-
61
-
62
-
63
-
64
-
65
-
66
-
67
-
68
-
69
-
70
-
71
-
72
-
73
-
74
-
75
-
76
-
77
-
78
-
79
-
80
-
81
-
82
-
83
-
84
-
85
-
86
-
87
-
88
-
89
-
90
-
91
-
92
-
93
-
94
-
95
-
96
-
97
-
98
-
99
-
100
-
101
-
102
-
103
-
104
-
105
-
106
-
107
-
108
-
109
-
110
-
111
-
112
-
113
-
114
-
115
-
116
-
117
-
118
-
119
-
120
-
121
-
122
-
123
-
124
-
125
-
126
-
127
-
 128
128 -
 129
129 -
 130
130 -
 131
131 -
 132
132 -
 133
133 -
 134
134 -
 135
135 -
 136
136 -
 137
137 -
 138
138 -
139
-
140
-
141
-
142
-
143
-
144
-
145
-
146
-
147
-
148
-
149
-
150
-
151
-
152
-
153
-
154
-
155
-
156
-
157
-
158
-
159
-
160
-
161
-
162
-
163
-
164
-
165
-
166
-
167
-
168
-
169
-
170
-
171
-
172
-
173
-
174
-
175
-
176
-
177
-
178
-
179
-
180
-
181
-
182
-
183
-
184
-
185
-
186
-
187
-
188
-
189
-
190
-
191
-
192
-
193
-
194
-
195
-
196
-
197
-
198
-
199
-
200
-
201
-
202
-
203
-
204
-
205
-
206
-
207
-
208
-
209
-
210
-
211
-
212
-
213
-
214
 |
 |
Removing and Installing Parts
133
6
Replace and tighten the four screws to secure the hard drive.
7
Connect the power and data cables to the drive.
8
Connect the data cable to the system board.
9
Check all cables to be certain that they are properly connected and firmly
seated.
10
Replace the computer cover (see "Replacing the Computer Cover" on
page 166).
1
second hard drive
(optional)
2
power cable
3
serial ATA data cable
4
system board
connector
5
screws (4)
6
screw holes in the hard
drive bay (4)
2
4
3
1
5
6