Dell Vostro 200 Owner's Manual - Page 148
blocking airflow between the fan and cooling vents.
 |
View all Dell Vostro 200 manuals
Add to My Manuals
Save this manual to your list of manuals |
Page 148 highlights
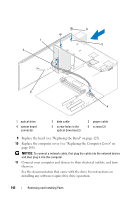
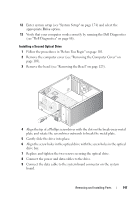
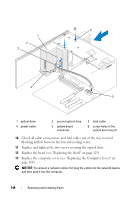
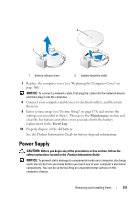
6 1 2 3 4 5 1 optical drive 4 power cable 2 second optical drive 5 system board connector 3 data cable 6 screw holes in the optical drive bay (2) 10 Check all cable connections, and fold cables out of the way to avoid blocking airflow between the fan and cooling vents. 11 Replace and tighten the two screws securing the optical drive. 12 Replace the bezel (see "Replacing the Bezel" on page 125). 13 Replace the computer cover (see "Replacing the Computer Cover" on page 166). NOTICE: To connect a network cable, first plug the cable into the network device and then plug it into the computer. 148 Removing and Installing Parts
-
 1
1 -
2
-
3
-
4
-
5
-
6
-
7
-
8
-
9
-
10
-
11
-
12
-
13
-
14
-
15
-
16
-
17
-
18
-
19
-
20
-
21
-
22
-
23
-
24
-
25
-
26
-
27
-
28
-
29
-
30
-
31
-
32
-
33
-
34
-
35
-
36
-
37
-
38
-
39
-
40
-
41
-
42
-
43
-
44
-
45
-
46
-
47
-
48
-
49
-
50
-
51
-
52
-
53
-
54
-
55
-
56
-
57
-
58
-
59
-
60
-
61
-
62
-
63
-
64
-
65
-
66
-
67
-
68
-
69
-
70
-
71
-
72
-
73
-
74
-
75
-
76
-
77
-
78
-
79
-
80
-
81
-
82
-
83
-
84
-
85
-
86
-
87
-
88
-
89
-
90
-
91
-
92
-
93
-
94
-
95
-
96
-
97
-
98
-
99
-
100
-
101
-
102
-
103
-
104
-
105
-
106
-
107
-
108
-
109
-
110
-
111
-
112
-
113
-
114
-
115
-
116
-
117
-
118
-
119
-
120
-
121
-
122
-
123
-
124
-
125
-
126
-
127
-
128
-
129
-
130
-
131
-
132
-
133
-
134
-
135
-
136
-
137
-
138
-
139
-
140
-
141
-
142
-
 143
143 -
 144
144 -
 145
145 -
 146
146 -
 147
147 -
 148
148 -
 149
149 -
 150
150 -
 151
151 -
 152
152 -
 153
153 -
154
-
155
-
156
-
157
-
158
-
159
-
160
-
161
-
162
-
163
-
164
-
165
-
166
-
167
-
168
-
169
-
170
-
171
-
172
-
173
-
174
-
175
-
176
-
177
-
178
-
179
-
180
-
181
-
182
-
183
-
184
-
185
-
186
-
187
-
188
-
189
-
190
-
191
-
192
-
193
-
194
-
195
-
196
-
197
-
198
-
199
-
200
-
201
-
202
-
203
-
204
-
205
-
206
-
207
-
208
-
209
-
210
-
211
-
212
-
213
-
214
 |
 |

148
Removing and Installing Parts
10
Check all cable connections, and fold cables out of the way to avoid
blocking airflow between the fan and cooling vents.
11
Replace and tighten the two screws securing the optical drive.
12
Replace the bezel (see "Replacing the Bezel" on page 125).
13
Replace the computer cover (see "Replacing the Computer Cover" on
page 166).
NOTICE:
To connect a network cable, first plug the cable into the network device
and then plug it into the computer.
1
optical drive
2
second optical drive
3
data cable
4
power cable
5
system board
connector
6
screw holes in the
optical drive bay (2)
1
2
3
4
5
6